Welcome to E-Waterសូមស្វាគមន៍មកកាន់ E-Water
E-Water App (Mobile Billing) is a mobile water billing application used by clean water operators for monthly meter reading. The app works together with the E-Water Desktop management system to make meter reading, water fee calculation, and invoice printing easier and faster.E-Water App (Mobile Billing) គឺជាកម្មវិធីសម្រាប់ចេញវិក្កយបត្រទឹកតាមទូរស័ព្ទ ដែលប្រើដោយប្រតិបត្តិករទឹកស្អាត សម្រាប់ស្រង់អំណានប្រចាំខែ។ កម្មវិធីនេះដំណើរការជាមួយប្រព័ន្ធគ្រប់គ្រង E-Water Desktop ដើម្បីជួយឱ្យការស្រង់អំណាន ការគណនាថ្លៃទឹក និងការបោះពុម្ពវិក្កយបត្រ មានភាពងាយស្រួល និងរហ័ស។
Meter readers can download customer data from the Desktop system to their mobile devices, enter water meter readings, record customer locations, automatically calculate water charges, and print invoices using a Bluetooth Printer. The app also supports customer disconnection and reconnection management, and allows completed reading data to be sent back to the Desktop management system.អ្នកស្រង់អាចទាញយកទិន្នន័យអតិថិជនពីប្រព័ន្ធ Desktop មកកាន់ទូរស័ព្ទ បញ្ចូលអំណានទឹក កត់ត្រាទីតាំងអតិថិជន គណនាតម្លៃដោយស្វ័យប្រវត្តិ និងបោះពុម្ពវិក្កយបត្រតាម Bluetooth Printer។ កម្មវិធីក៏គាំទ្រការគ្រប់គ្រងការផ្តាច់ និងភ្ជាប់អតិថិជន ព្រមទាំងអាចបញ្ជូនទិន្នន័យត្រឡប់ទៅប្រព័ន្ធគ្រប់គ្រងលើកុំព្យូទ័រ បន្ទាប់ពីស្រង់រួច។
The application can work both online and offline, so meter readers can continue their work in different locations without worrying about internet connection issues.កម្មវិធីនេះអាចប្រើបានទាំងពេលមានអ៊ីនធឺណិត និងពេលគ្មានអ៊ីនធឺណិត ដូច្នេះអ្នកស្រង់អាចបន្តការងារនៅតាមទីតាំងផ្សេងៗបានដោយមិនបារម្ភពីបញ្ហាបណ្តាញ។
The system has two main parts:នៅក្នុងប្រព័ន្ធនេះ មានផ្នែកសំខាន់ៗពីរ៖
- E-Water Desktop is used by office staff to create customer information, set up reading areas, and generate QR Codes for device registration.ប្រព័ន្ធ E-Water Desktop ប្រើសម្រាប់បុគ្គលិកការិយាល័យបង្កើតព័ត៌មានអតិថិជន កំណត់តំបន់ស្រង់អំណាន និងបង្កើត QR Code សម្រាប់ចុះបញ្ជីឧបករណ៍។
- E-Water Mobile is used by meter readers for daily operations, such as viewing customer lists, recording meter readings, printing invoices, checking reading progress, and tracking data submission or bank submission for the day.កម្មវិធី E-Water Mobile ប្រើសម្រាប់អ្នកស្រង់អំណានប្រចាំថ្ងៃ ដើម្បីមើលបញ្ជីអតិថិជន ស្រង់អំណាន បោះពុម្ពវិក្កយបត្រ ពិនិត្យដំណើរការស្រង់ និងតាមដានការបញ្ជូនទិន្នន័យ ឬការបញ្ជូនទៅធនាគារសម្រាប់ថ្ងៃនោះ។
Before using the app for the first time, the meter reader needs to scan a QR Code to register the device. After that, the customer database is downloaded to the mobile phone. Once completed, the meter reader can start recording readings and issuing invoices immediately.មុនពេលប្រើប្រាស់លើកដំបូង អ្នកស្រង់ត្រូវស្កេន QR Code ដើម្បីចុះបញ្ជីឧបករណ៍ បន្ទាប់មកទាញយកមូលដ្ឋានទិន្នន័យអតិថិជនចូលក្នុងទូរស័ព្ទ។ បន្ទាប់ពីនោះ អ្នកស្រង់អាចចាប់ផ្តើមធ្វើការស្រង់អំណាន និងចេញវិក្កយបត្របានភ្លាមៗ។
1.Register Device & Download Dataចុះបញ្ជីឧបករណ៍ & ទាញយកទិន្នន័យ
Open Settings → Download Data before using a device for the first time or whenever the office prepares a new billing round. This page has two jobs: activate the phone with a Desktop-generated access key, then download the customer database assigned to that phone.មុនប្រើឧបករណ៍លើកដំបូង ឬពេលការិយាល័យរៀបចំវគ្គចេញវិក្កយបត្រថ្មី សូមចូល ការកំណត់ → ទាញយកទិន្នន័យ។ ទំព័រនេះមានមុខងារពីរ៖ ចុះបញ្ជីទូរស័ព្ទដោយប្រើលេខកូដពី Desktop ហើយទាញយកមូលដ្ឋានទិន្នន័យអតិថិជនដែលបានកំណត់សម្រាប់ទូរស័ព្ទនោះ។
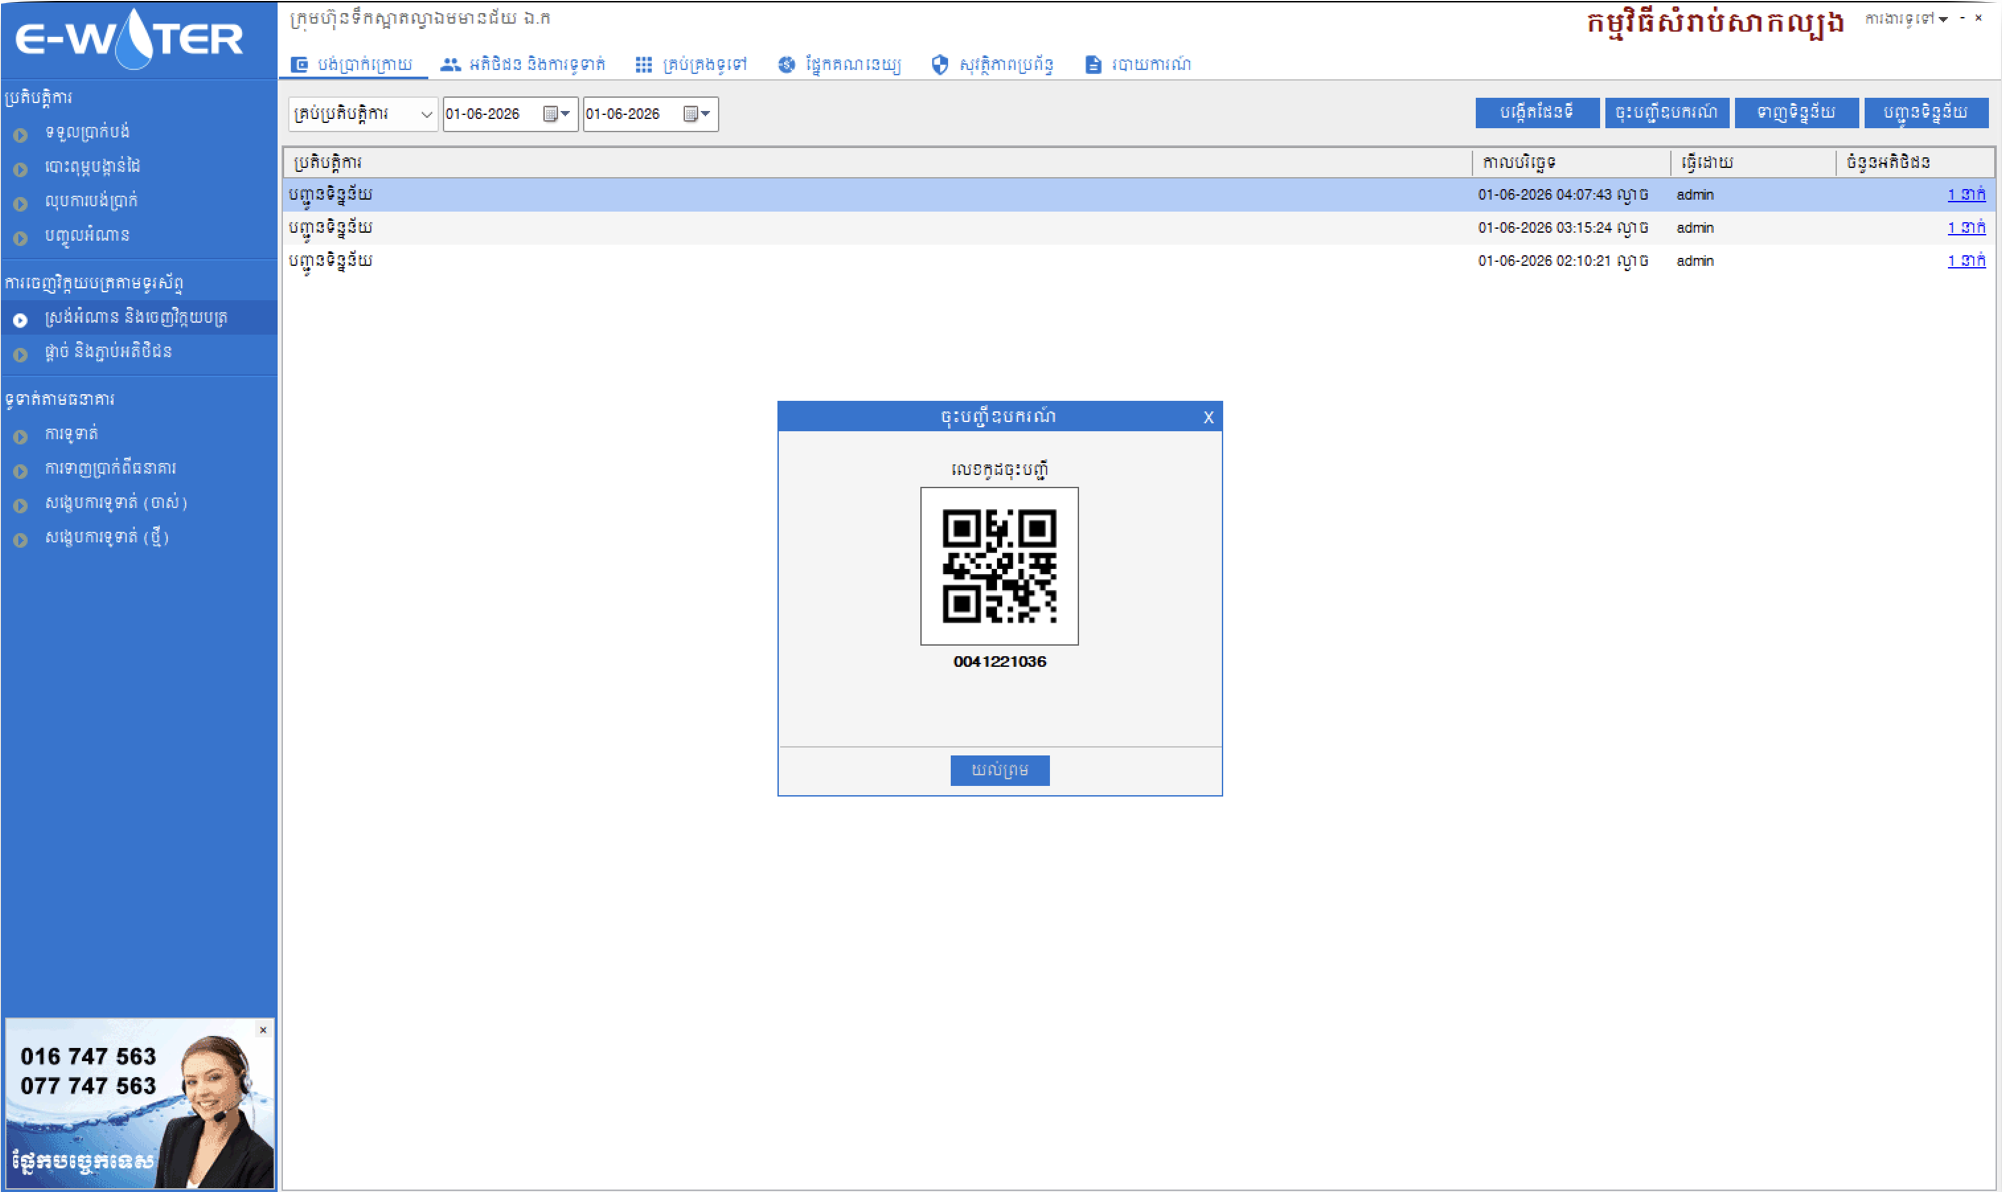
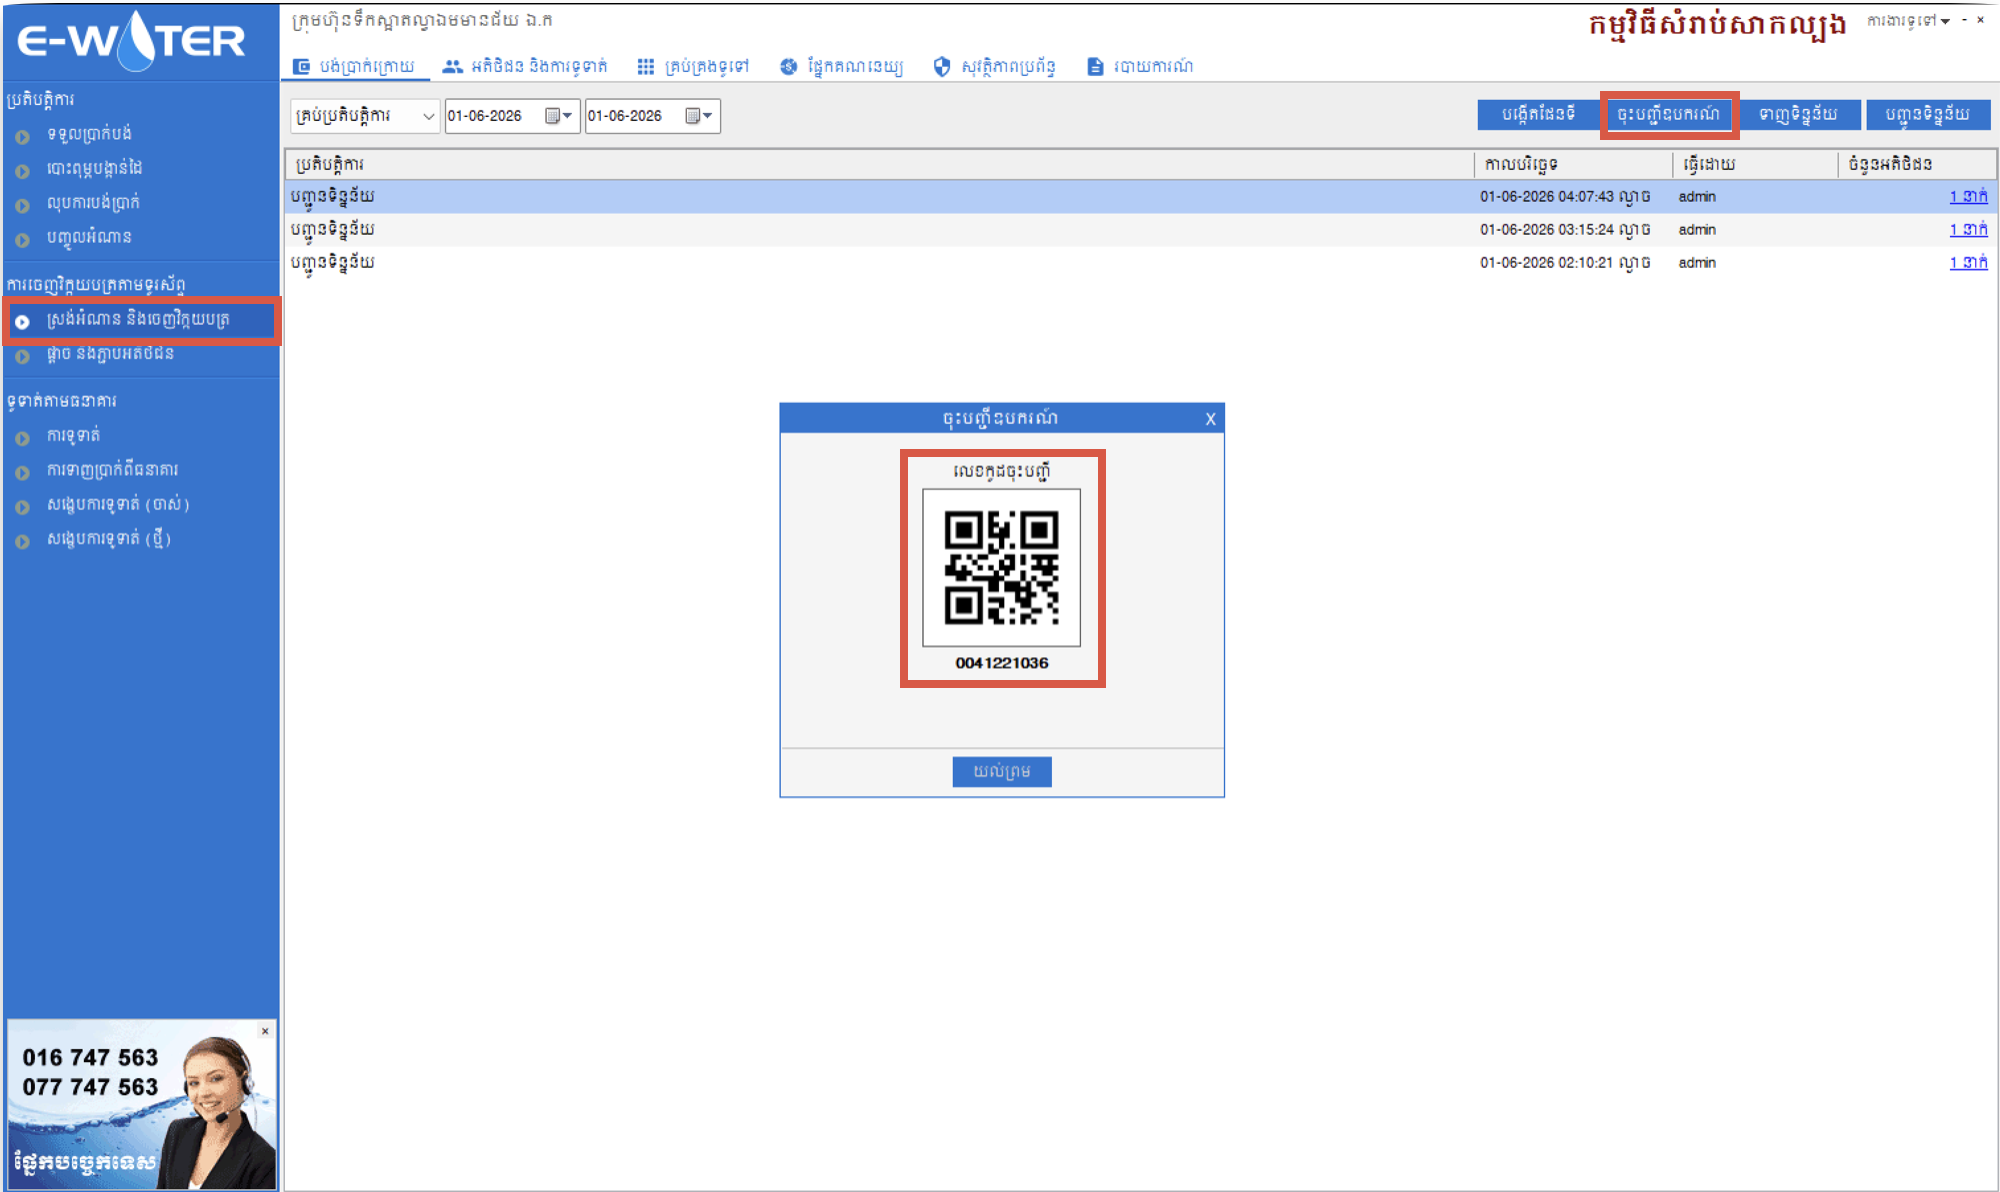
- Prepare the device on Desktop. In E-Water Desktop, open the device-registration screen and display the QR code for the meter reader's phone. The QR contains the access key used to connect the phone to the assigned database.រៀបចំឧបករណ៍នៅលើ Desktop។ ក្នុង E-Water Desktop សូមបើកទំព័រចុះបញ្ជីឧបករណ៍ ហើយបង្ហាញ QR Code សម្រាប់ទូរស័ព្ទរបស់អ្នកស្រង់។ QR Code នេះមានលេខកូដសម្រាប់ភ្ជាប់ទូរស័ព្ទទៅមូលដ្ឋានទិន្នន័យដែលបានកំណត់។
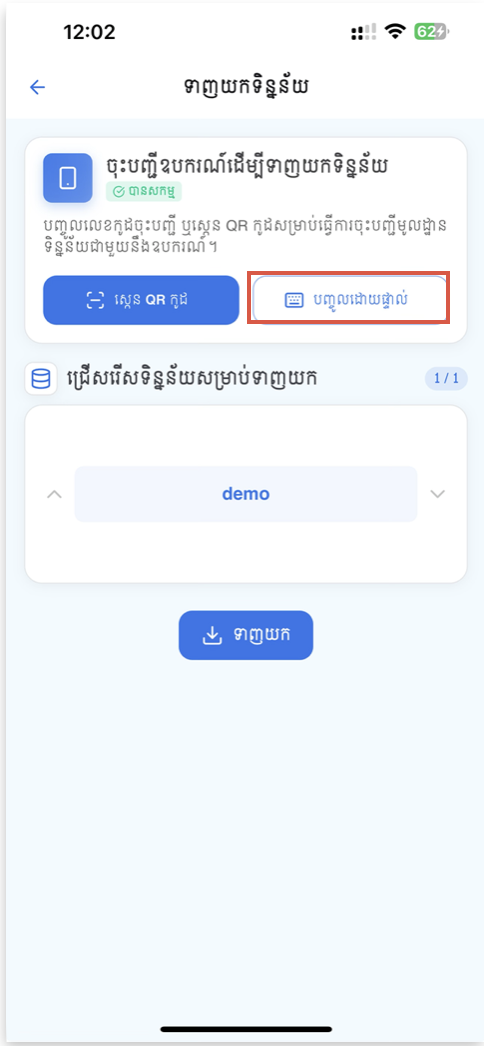
- Check the activation card on mobile. At the top of Download Data, the Activate Device Database card shows whether the phone is Activated or Not activated. If it is already activated, continue to the database selector.ពិនិត្យកាតចុះបញ្ជីនៅលើទូរស័ព្ទ។ នៅផ្នែកខាងលើនៃទំព័រ ទាញយកទិន្នន័យ កាត ចុះបញ្ជីឧបករណ៍ដើម្បីទាញយកទិន្នន័យ បង្ហាញថា ទូរស័ព្ទ បានសកម្ម ឬ មិនទាន់សកម្ម។ ប្រសិនបើបានសកម្មរួច សូមបន្តទៅផ្នែកជ្រើសរើសមូលដ្ឋានទិន្នន័យ។
- Activate the phone. Tap Scan QR Code, position the Desktop QR inside the scanner frame, and wait for the access key to be detected. If scanning is not convenient, tap Manual Input, type the access key, and confirm the activation. A success message appears and the status changes to the green Activated badge.ចុះបញ្ជីទូរស័ព្ទ។ ចុច ស្កេន QR កូដ ដាក់ QR Code ពី Desktop ឱ្យស្ថិតក្នុងស៊ុមស្កេន ហើយរង់ចាំឱ្យកម្មវិធីអានលេខកូដ។ ប្រសិនបើមិនងាយស្កេន សូមចុច បញ្ចូលដោយផ្ទាល់ វាយលេខកូដ ហើយបញ្ជាក់ការចុះបញ្ជី។ ពេលជោគជ័យ សារបញ្ជាក់នឹងបង្ហាញ ហើយស្ថានភាពប្ដូរទៅស្លាក បានសកម្ម ពណ៌បៃតង។
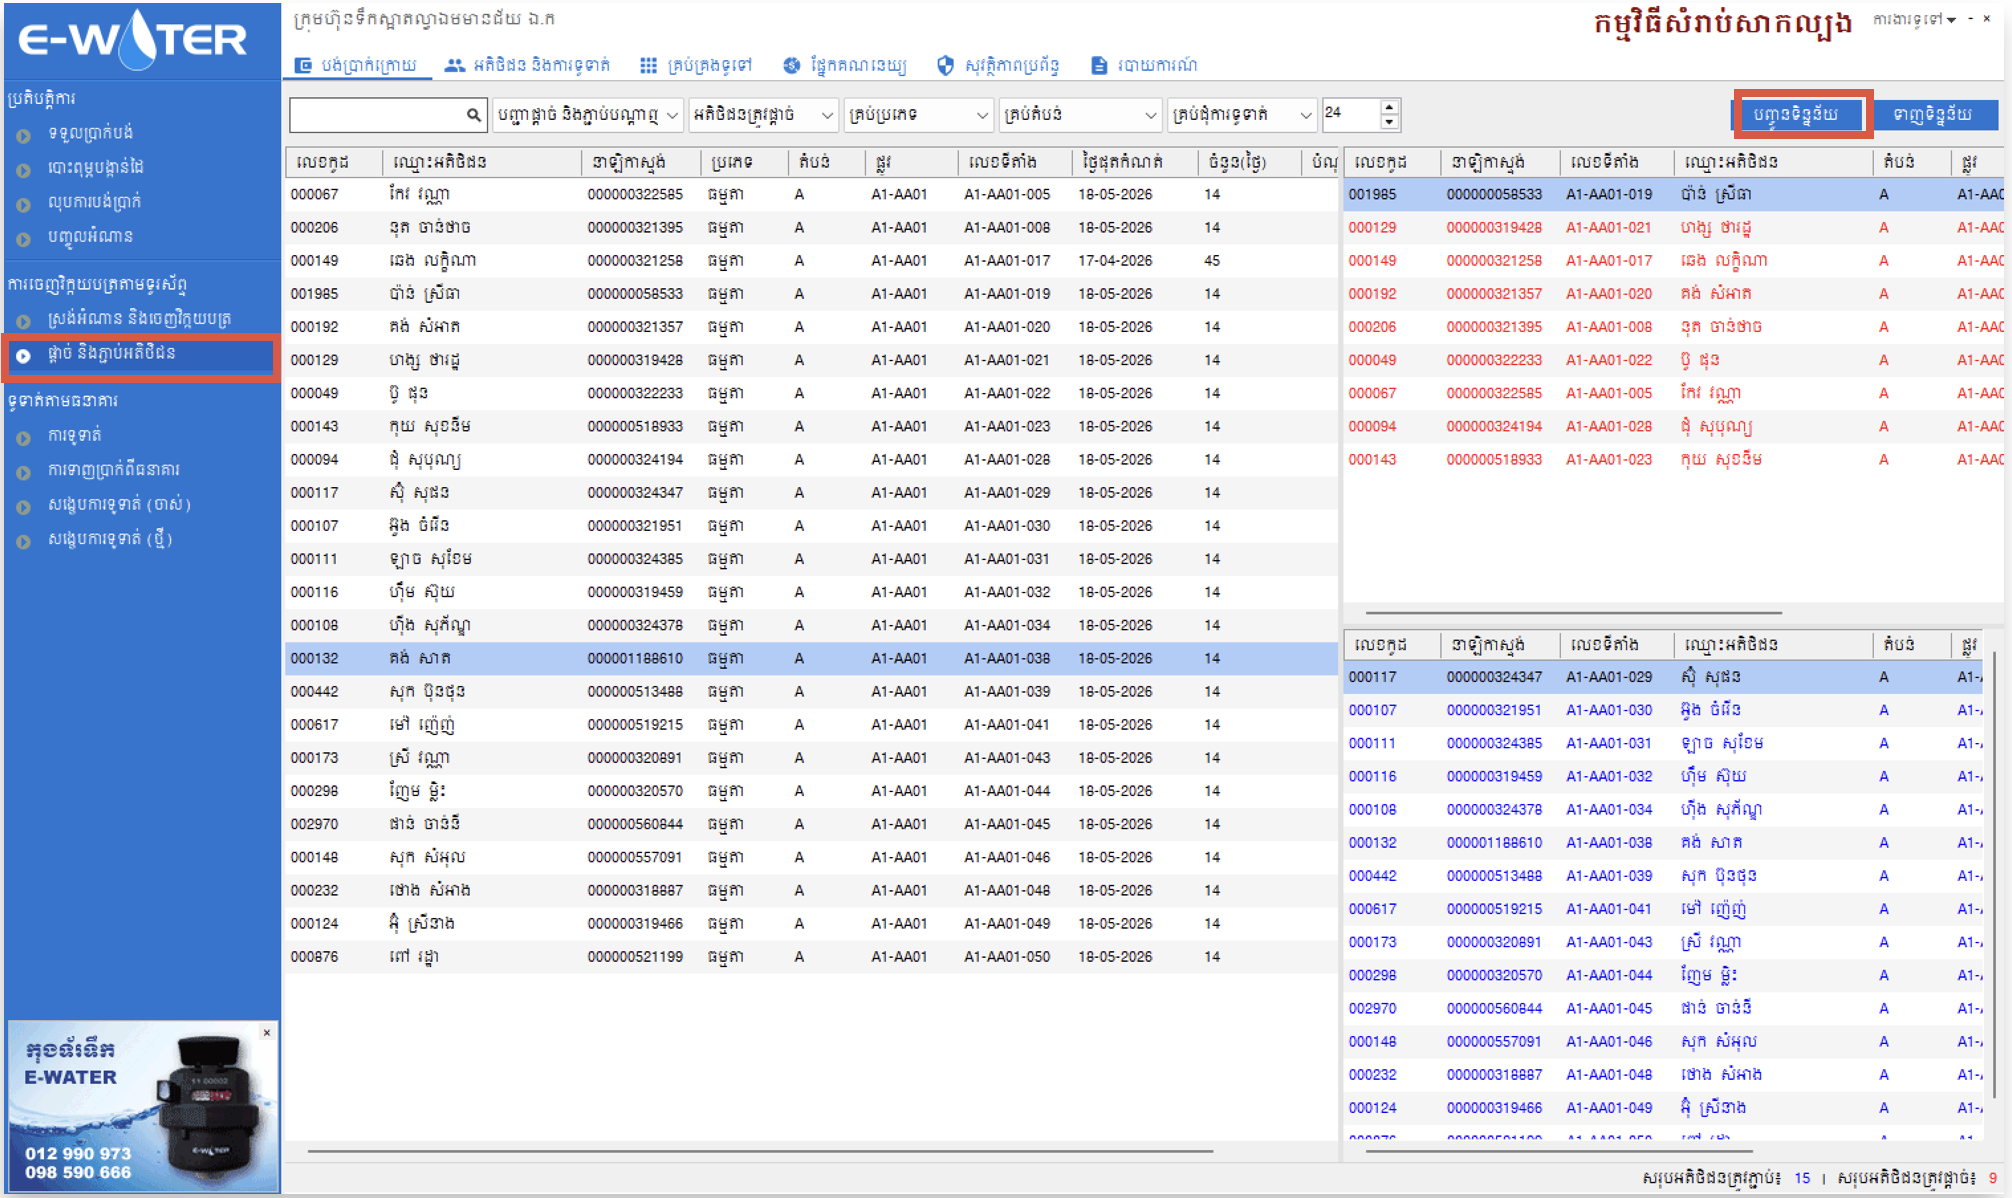
- Publish a billing round from Desktop. In E-Water Desktop, use the upload screen to select the required reading round or row and submit it. This makes the prepared customer data available for the registered phone.បញ្ជូនវគ្គស្រង់ពី Desktop។ នៅក្នុង E-Water Desktop សូមប្រើទំព័រ Upload ដើម្បីជ្រើសរើសវគ្គ ឬជួរអតិថិជនដែលត្រូវស្រង់ រួចចុចបញ្ជូន។ បន្ទាប់មកទិន្នន័យអតិថិជននឹងអាចទាញយកបាននៅលើទូរស័ព្ទដែលបានចុះបញ្ជី។
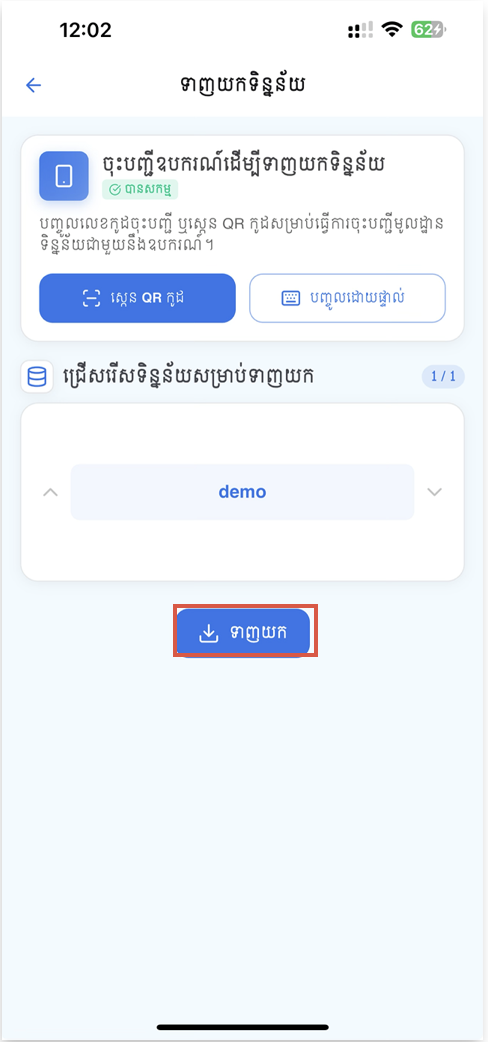
- Select the database on mobile. The Select Database to Download card shows the selected database name and its position, such as 1 / 5. Use the arrows to choose the correct database when more than one is available.ជ្រើសរើសមូលដ្ឋានទិន្នន័យនៅលើទូរស័ព្ទ។ កាត ជ្រើសរើសទិន្នន័យសម្រាប់ទាញយក បង្ហាញឈ្មោះមូលដ្ឋានទិន្នន័យ និងលំដាប់ ដូចជា 1 / 5។ ប្រសិនបើមានច្រើនជាងមួយ សូមប្រើព្រួញដើម្បីជ្រើសរើសទិន្នន័យត្រឹមត្រូវ។
- Download and wait for completion. Tap the blue Download button. The app displays download and import progress before confirming completion. When finished, open Bill Collection and verify that the customer list is available.ទាញយក ហើយរង់ចាំដល់ចប់។ ចុចប៊ូតុង ទាញយក ពណ៌ខៀវ។ កម្មវិធីនឹងបង្ហាញដំណើរការទាញយក និងបញ្ចូលទិន្នន័យ រហូតដល់បញ្ជាក់ថាបានបញ្ចប់។ បន្ទាប់មកចូល ចេញវិក្កយបត្រ ដើម្បីពិនិត្យថាបញ្ជីអតិថិជនមានរួចរាល់។
Important: If the phone still has readings that have not been uploaded, the app warns that downloading new data can replace them. Upload or verify the pending work before continuing.សំខាន់៖ ប្រសិនបើក្នុងទូរស័ព្ទនៅមានទិន្នន័យស្រង់ដែលមិនទាន់បានបញ្ជូន កម្មវិធីនឹងព្រមានថាការទាញយកថ្មីអាចជំនួសទិន្នន័យចាស់។ សូមបញ្ជូន ឬពិនិត្យទិន្នន័យដែលកំពុងរង់ចាំ មុនបន្ត។


2.Home & Overviewទំព័រដើម & ទិដ្ឋភាពទូទៅ
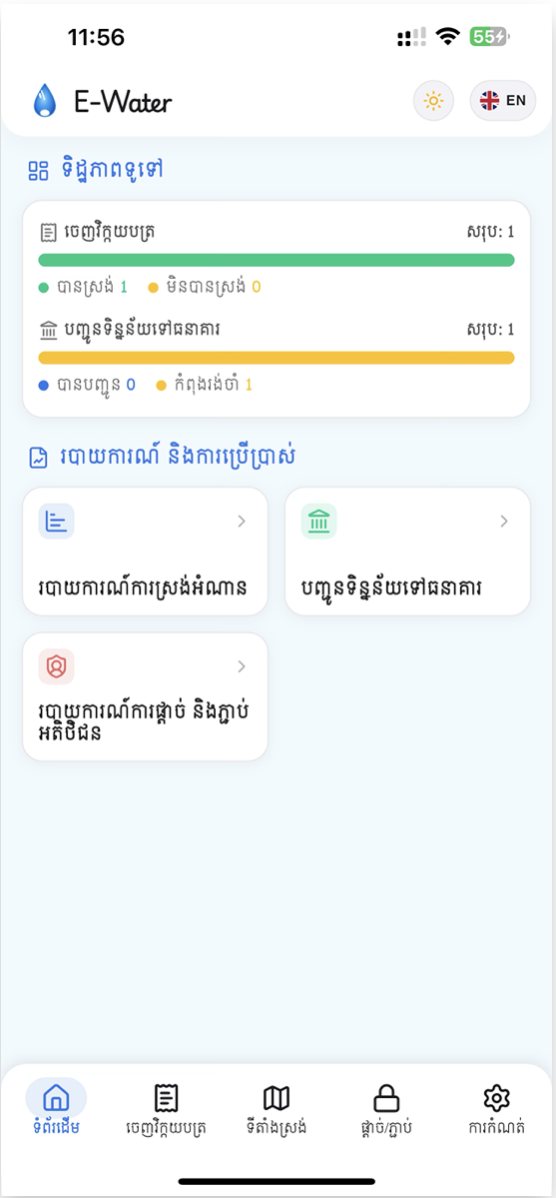
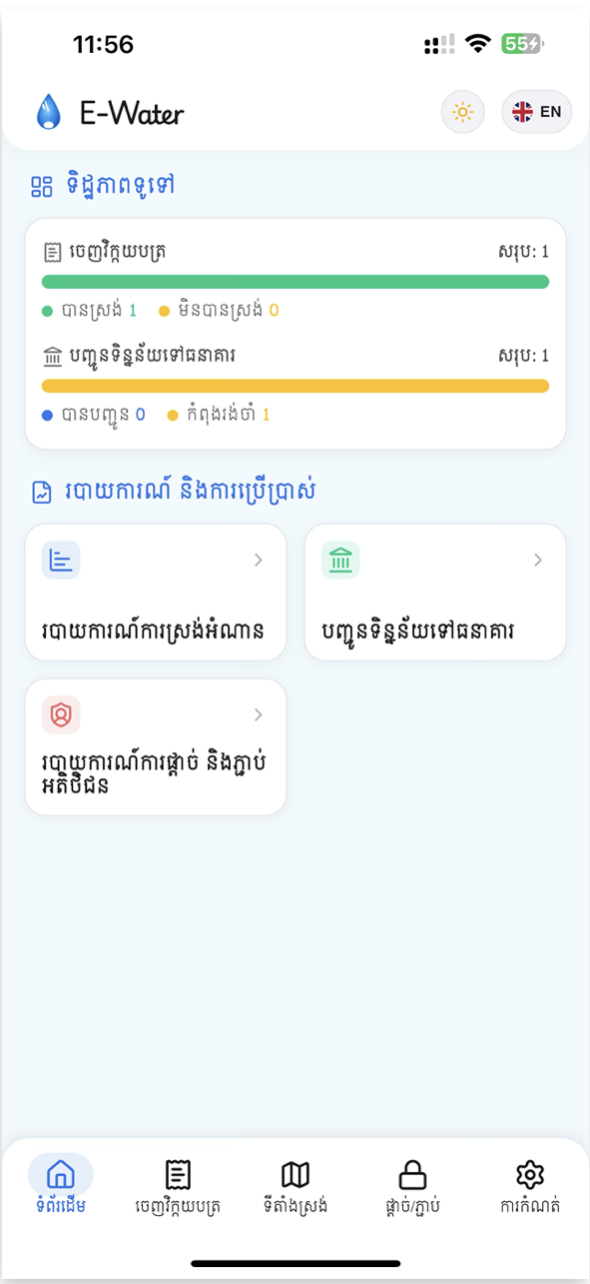
Use Home as the daily starting point. The Overview card gives a quick live picture of reading progress and bank-submission progress without opening a report. Each row has its own total because the two rows measure different stages of the workflow.សូមប្រើ ទំព័រដើម ជាចំណុចចាប់ផ្ដើមការងារប្រចាំថ្ងៃ។ កាត ទិដ្ឋភាពទូទៅ បង្ហាញស្ថានភាពស្រង់អំណាន និងស្ថានភាពបញ្ជូនទៅធនាគារ ដោយមិនចាំបាច់បើករបាយការណ៍។ របារនីមួយៗមានចំនួនសរុបផ្សេងគ្នា ព្រោះវាវាស់ដំណាក់កាលការងារផ្សេងគ្នា។
- Bill Collection — compares Collected and Not Collected customers. The total on the right is the full customer count for the downloaded billing round.ចេញវិក្កយបត្រ — ប្រៀបធៀបចំនួនអតិថិជន បានស្រង់ និង មិនទាន់ស្រង់។ ចំនួនសរុបនៅខាងស្ដាំ គឺចំនួនអតិថិជនទាំងអស់ក្នុងវគ្គដែលបានទាញយក។
- Sent Usage To Bank — compares Submitted and Pending invoices among the customers already collected. The total on this row is therefore the collected count, not the full customer count.បញ្ជូនទិន្នន័យទៅធនាគារ — ប្រៀបធៀបវិក្កយបត្រ បានបញ្ជូន និង កំពុងរង់ចាំ ក្នុងចំណោមអតិថិជនដែលបានស្រង់រួច។ ដូច្នេះ ចំនួនសរុបរបស់របារនេះ គឺចំនួនបានស្រង់ មិនមែនចំនួនអតិថិជនទាំងអស់ទេ។
- Refresh the summary — pull down on the page when you want to reload the latest counts after field work or an upload.ធ្វើបច្ចុប្បន្នភាពសង្ខេប — ទាញទំព័រចុះក្រោម ដើម្បីផ្ទុកចំនួនថ្មី បន្ទាប់ពីស្រង់ ឬបញ្ជូនទិន្នន័យ។
Below the overview, the Report and Usage grid provides three shortcuts: Report Collect Usage, Sent Usage To Bank, and Reports Block And Unblock. Open these pages when you need customer lists, charts, or an upload action.ខាងក្រោមកាតទិដ្ឋភាពទូទៅ ផ្នែក របាយការណ៍ និងការប្រើប្រាស់ មានផ្លូវកាត់បី៖ របាយការណ៍ការស្រង់អំណាន, បញ្ជូនទិន្នន័យទៅធនាគារ និង របាយការណ៍ផ្តាច់ និងភ្ជាប់។ សូមបើកទំព័រទាំងនេះ នៅពេលត្រូវការមើលបញ្ជីអតិថិជន ក្រាហ្វ ឬបញ្ជូនទិន្នន័យ។
3.Bill Collectionចេញវិក្កយបត្រ
Use Bill Collection for the main field workflow: select a customer, enter the current meter reading, review the calculated consumption and amount, capture the location, then print or share the invoice. The form is designed to work with downloaded customer data even when the phone is temporarily offline.ប្រើ ចេញវិក្កយបត្រ សម្រាប់ការងារស្រង់នៅទីតាំងអតិថិជន៖ ជ្រើសរើសអតិថិជន បញ្ចូលអំណានស្ទង់បច្ចុប្បន្ន ពិនិត្យការប្រើប្រាស់ និងតម្លៃដែលបានគណនា កត់ត្រាទីតាំង រួចបោះពុម្ព ឬចែករំលែកវិក្កយបត្រ។ ទំព័រនេះអាចប្រើទិន្នន័យដែលបានទាញយក ទោះបីទូរស័ព្ទគ្មានអ៊ីនធឺណិតជាបណ្ដោះអាសន្នក៏ដោយ។
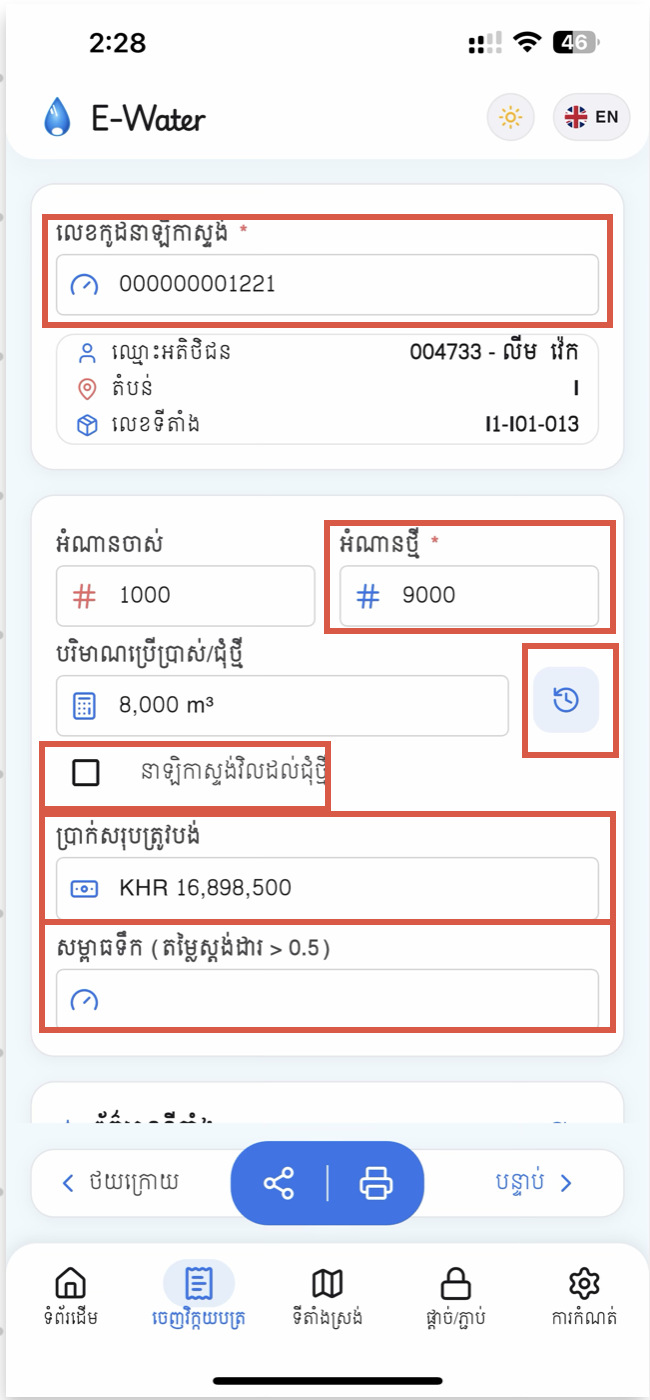
- Find the customer by Meter Code. Type at least two characters in the required Meter Code field to see suggestions. Each suggestion shows the meter code and the matching customer code and name. Choose a suggestion or submit the full meter code. You can also use Previous and Next at the bottom to move through the downloaded sequence.ស្វែងរកអតិថិជនតាមលេខស្ទង់។ វាយយ៉ាងហោចណាស់ពីរតួអក្សរក្នុងប្រអប់ លេខស្ទង់ ដែលចាំបាច់ ដើម្បីមើលសំណើ។ សំណើនីមួយៗបង្ហាញលេខស្ទង់ លេខកូដអតិថិជន និងឈ្មោះ។ សូមជ្រើសរើសសំណើ ឬវាយលេខស្ទង់ពេញ រួចបញ្ជូន។ អ្នកក៏អាចប្រើប៊ូតុង មុន និង បន្ទាប់ ខាងក្រោម ដើម្បីផ្លាស់ទីតាមលំដាប់អតិថិជនបានដែរ។
- Verify the read-only customer details. After a match is found, confirm the customer code and name, Area, and Box. If the information does not match the physical meter location, stop and search again before entering a reading.ផ្ទៀងផ្ទាត់ព័ត៌មានអតិថិជនដែលមិនអាចកែបាន។ បន្ទាប់ពីរកឃើញអតិថិជន សូមពិនិត្យលេខកូដ និងឈ្មោះ តំបន់ និង ប្រអប់។ ប្រសិនបើព័ត៌មានមិនត្រូវនឹងទីតាំងស្ទង់ទឹក សូមឈប់ ហើយស្វែងរកឡើងវិញ មុនបញ្ចូលអំណាន។
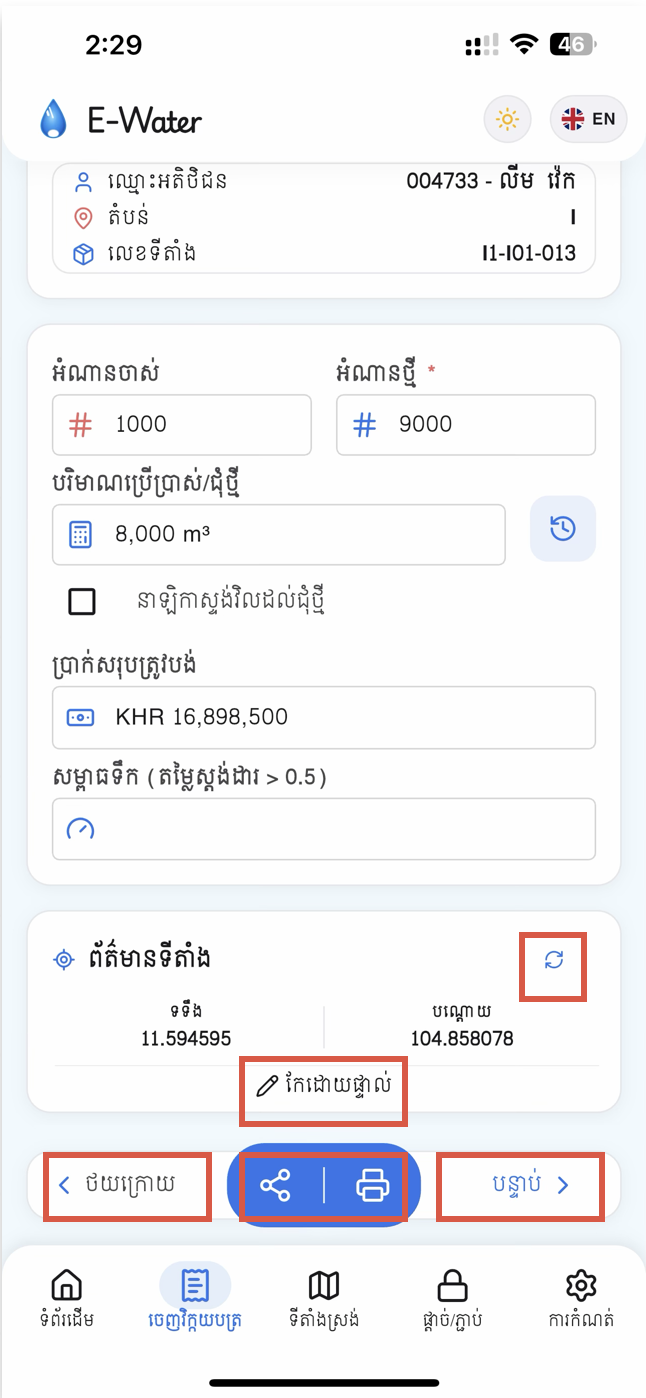
- Enter End Usage. Start Usage is read-only and comes from the previous cycle. Type the number currently displayed on the physical meter into the required End Usage field. The app immediately calculates Consumption / New Cycle and Total Settle Amount from the pricing rules configured in E-Water Desktop.បញ្ចូលអំណានបញ្ចប់។ អំណានដើម មិនអាចកែបាន ហើយយកពីវគ្គមុន។ សូមវាយលេខដែលបង្ហាញលើស្ទង់ទឹកពេលនេះ ក្នុងប្រអប់ អំណានបញ្ចប់។ កម្មវិធីនឹងគណនា ការប្រើប្រាស់ / ជុំថ្មី និង ចំនួនទឹកប្រាក់សរុប ភ្លាមៗ តាមលក្ខខណ្ឌតម្លៃដែលបានកំណត់ក្នុង E-Water Desktop។
- Use New Cycle only when needed. If the current meter reading is lower because the meter rolled over or was replaced, select Reset meter reading to new cycle. Leave it unchecked for normal readings. The app asks for confirmation before continuing with a new-cycle invoice.ប្រើជុំថ្មីតែពេលចាំបាច់។ ប្រសិនបើអំណានបច្ចុប្បន្នតូចជាងអំណានដើម ដោយសារស្ទង់គ្រប់ខ្ទង់ ឬបានប្ដូរស្ទង់ថ្មី សូមធីក កំណត់អំណានស្ទង់ដល់ជុំថ្មី។ សម្រាប់ការស្រង់ធម្មតា សូមកុំធីក។ កម្មវិធីនឹងសួរបញ្ជាក់ មុនបន្តវិក្កយបត្រជុំថ្មី។
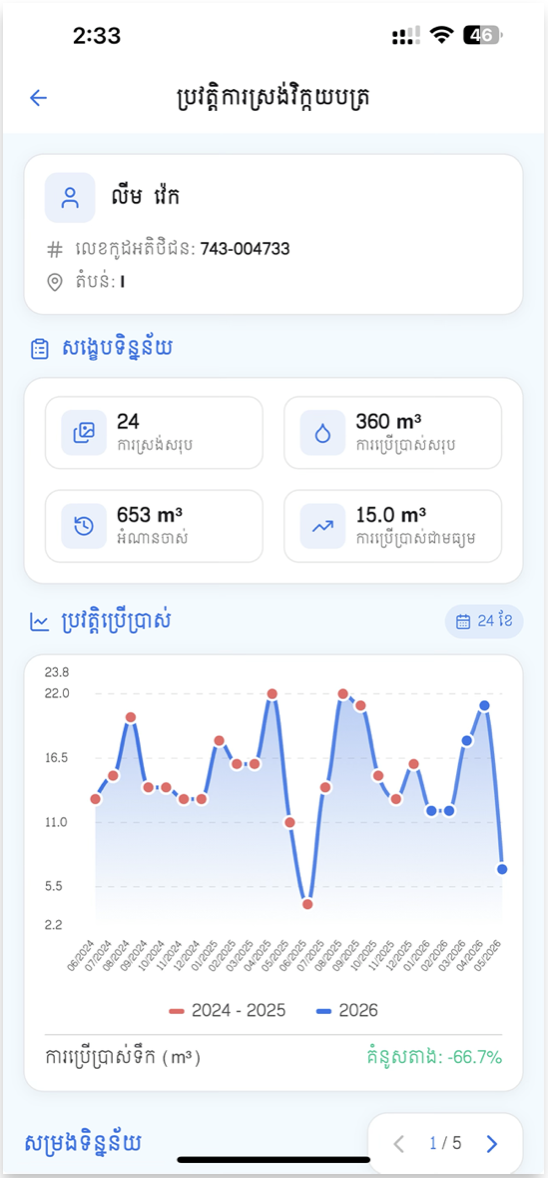
- Review Usage History. Tap the round history icon beside Consumption to open the full collection-history page. It shows customer information, summary values, a monthly usage chart with trend information, and a detailed monthly list. Use it to identify unusual usage before printing.ពិនិត្យប្រវត្តិការប្រើប្រាស់។ ចុចរូបប្រវត្តិមូលនៅក្បែរ ការប្រើប្រាស់ ដើម្បីបើកទំព័រប្រវត្តិស្រង់ពេញលេញ។ ទំព័រនេះបង្ហាញព័ត៌មានអតិថិជន សង្ខេប ក្រាហ្វប្រើប្រាស់ប្រចាំខែជាមួយនិន្នាការ និងបញ្ជីប្រចាំខែលម្អិត។ សូមប្រើវាដើម្បីរកការប្រើប្រាស់មិនធម្មតា មុនបោះពុម្ព។
- Record Water Pressure when available. Enter the measured value in the Water Pressure field. The screen shows the standard as > 0.5 bar and displays a validation warning when a non-empty value is not valid.កត់ត្រាសម្ពាធទឹក ប្រសិនបើមាន។ បញ្ចូលតម្លៃដែលបានវាស់ក្នុងប្រអប់ សម្ពាធទឹក។ ទំព័របង្ហាញតម្លៃស្ដង់ដារ > 0.5 bar ហើយនឹងបង្ហាញការព្រមាន ប្រសិនបើតម្លៃដែលបានបញ្ចូលមិនត្រឹមត្រូវ។
- Capture or preserve the location. The Location Information card shows latitude, longitude, and GPS accuracy when available. A saved customer location stays unchanged until you tap refresh or edit it. Tap refresh to capture the current GPS position, or tap Edit manually to enter latitude and longitude yourself.ចាប់ទីតាំង ឬរក្សាទីតាំងចាស់។ កាត ព័ត៌មានទីតាំង បង្ហាញរយៈទទឹង រយៈបណ្ដោយ និងភាពត្រឹមត្រូវ GPS ប្រសិនបើមាន។ ទីតាំងដែលបានរក្សាទុកនឹងមិនប្ដូរទេ លុះត្រាតែអ្នកចុចផ្ទុកឡើងវិញ ឬកែដោយផ្ទាល់។ ចុចរូបផ្ទុកឡើងវិញ ដើម្បីចាប់ទីតាំង GPS បច្ចុប្បន្ន ឬចុច កែដោយផ្ទាល់ ដើម្បីវាយកូអរដោនេ។
- Preview, share, or print. Tap Total Settle Amount to open the invoice preview. The center action pill at the bottom also provides direct Share and Print shortcuts. Share exports a PNG invoice image through the phone's share sheet; Print sends the invoice to the selected Bluetooth thermal printer.មើលជាមុន ចែករំលែក ឬបោះពុម្ព។ ចុច ចំនួនទឹកប្រាក់សរុប ដើម្បីបើកការមើលវិក្កយបត្រជាមុន។ ប៊ូតុងមូលនៅកណ្ដាលផ្នែកខាងក្រោម ក៏មានផ្លូវកាត់ ចែករំលែក និង បោះពុម្ព។ ការចែករំលែកនឹងនាំចេញវិក្កយបត្រជារូបភាព PNG តាមផ្ទាំងចែករំលែករបស់ទូរស័ព្ទ។ ការបោះពុម្ពនឹងផ្ញើវិក្កយបត្រទៅម៉ាស៊ីនបោះពុម្ព Bluetooth ដែលបានជ្រើសរើស។
4.Invoice Preview, Print & Shareមើលវិក្កយបត្រ បោះពុម្ព & ចែករំលែក
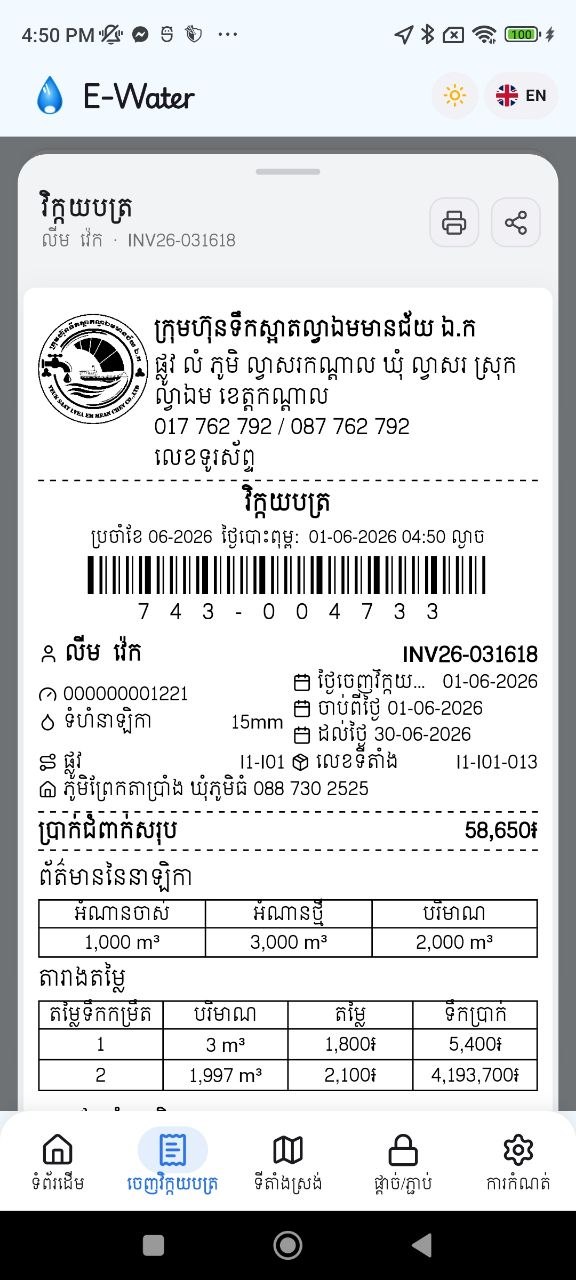
Use the invoice preview to check the customer-facing receipt before printing or sharing it. From Bill Collection, tap Total Settle Amount for preview, or use the bottom Share and Print shortcuts after a valid reading has been entered. The receipt is rendered as a thermal-invoice layout and always uses the Siem Reap font for consistent Khmer output.ប្រើការមើលវិក្កយបត្រជាមុន ដើម្បីពិនិត្យបង្កាន់ដៃសម្រាប់អតិថិជន មុនបោះពុម្ព ឬចែករំលែក។ ក្នុងទំព័រ ចេញវិក្កយបត្រ សូមចុច ចំនួនទឹកប្រាក់សរុប ដើម្បីមើលជាមុន ឬប្រើប៊ូតុង ចែករំលែក និងបោះពុម្ព ខាងក្រោម បន្ទាប់ពីបញ្ចូលអំណានត្រឹមត្រូវ។ វិក្កយបត្រត្រូវបានបង្ហាញជាទម្រង់សម្រាប់ម៉ាស៊ីនបោះពុម្ព Thermal ហើយប្រើពុម្ពអក្សរ Siem Reap ជានិច្ច ដើម្បីឱ្យអក្សរខ្មែរបង្ហាញស្មើគ្នា។
Review these parts of the receipt:សូមពិនិត្យផ្នែកទាំងនេះក្នុងវិក្កយបត្រ៖
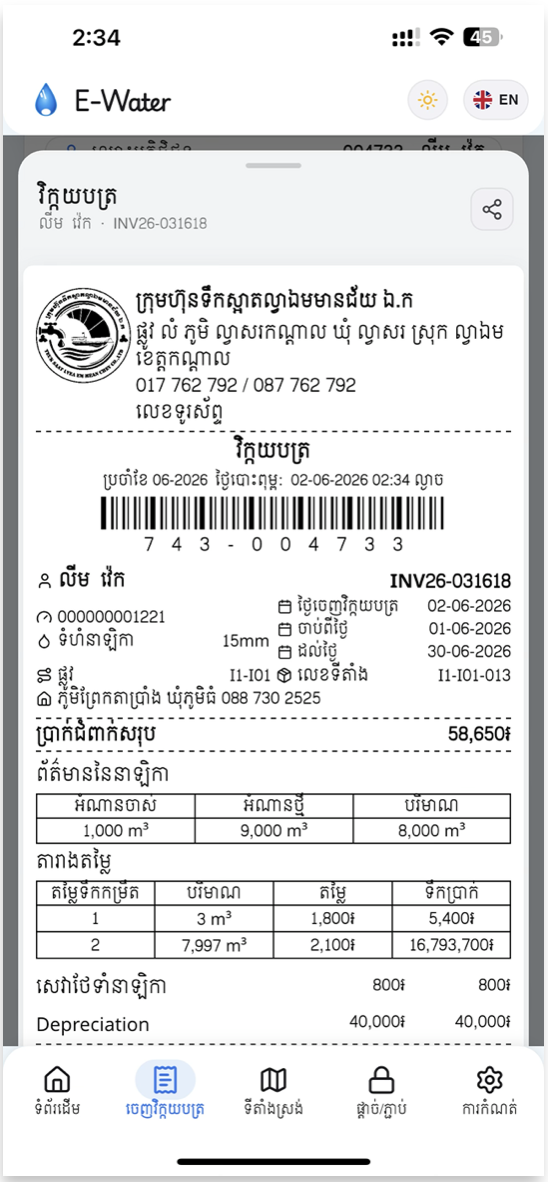
- Company header — verify the company logo, company name, address, and contact phone numbers.ក្បាលវិក្កយបត្រ — ផ្ទៀងផ្ទាត់រូបសញ្ញា ឈ្មោះក្រុមហ៊ុន អាសយដ្ឋាន និងលេខទូរស័ព្ទទំនាក់ទំនង។
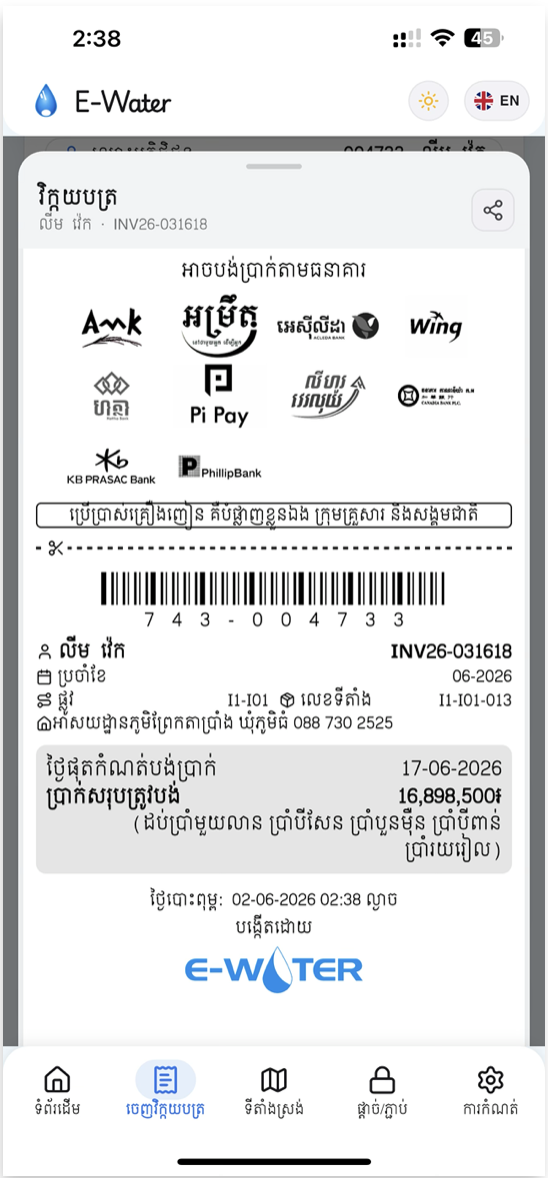
- Barcode and invoice reference — verify the barcode, payment code, and unique invoice number, such as INV26-031618.បារកូដ និងលេខយោងវិក្កយបត្រ — ផ្ទៀងផ្ទាត់បារកូដ លេខកូដទូទាត់ និងលេខវិក្កយបត្រតែមួយ ដូចជា INV26-031618។
- Customer and billing details — check the customer code and name, meter code, pipe size, area and box, invoice date, service period, and due date.ព័ត៌មានអតិថិជន និងដំណាច់វិក្កយបត្រ — ពិនិត្យលេខកូដ និងឈ្មោះអតិថិជន លេខស្ទង់ ទំហំបំពង់ តំបន់ និងប្រអប់ ថ្ងៃចេញវិក្កយបត្រ រយៈពេលប្រើប្រាស់ និងថ្ងៃផុតកំណត់។
- Total settle amount — confirm that the prominently displayed grand total matches the amount calculated on the Bill Collection screen.ចំនួនទឹកប្រាក់សរុប — ផ្ទៀងផ្ទាត់ថាចំនួនសរុបដែលបង្ហាញច្បាស់ ត្រូវនឹងតម្លៃដែលគណនាក្នុងទំព័រ ចេញវិក្កយបត្រ។
- Meter-reading table — review the previous reading, current reading, and water consumption in m³.តារាងអំណានស្ទង់ — ពិនិត្យអំណានមុន អំណានបច្ចុប្បន្ន និងការប្រើប្រាស់ទឹកជា m³។
- Pricing breakdown and optional chart — review each tariff or service row that contributes to the total. When Show chart on invoice is enabled in Settings and history is available, the receipt also includes a recent-usage chart.ការបំបែកតម្លៃ និងក្រាហ្វជាជម្រើស — ពិនិត្យតម្លៃតាមកម្រិត ឬសេវាកម្មនីមួយៗ ដែលចូលរួមក្នុងចំនួនសរុប។ ប្រសិនបើបានបើក បង្ហាញក្រាហ្វលើវិក្កយបត្រ ក្នុងការកំណត់ ហើយមានប្រវត្តិប្រើប្រាស់ វិក្កយបត្រក៏បង្ហាញក្រាហ្វប្រើប្រាស់ថ្មីៗផងដែរ។
- Print — tap the printer icon to send the receipt image to the selected Bluetooth thermal printer. Printing must be enabled in Settings → Printing, a printer must be selected, and the invoice must not have reached its configured print limit.បោះពុម្ព — ចុចរូបម៉ាស៊ីនបោះពុម្ព ដើម្បីផ្ញើរូបភាពវិក្កយបត្រទៅម៉ាស៊ីន Thermal Bluetooth ដែលបានជ្រើសរើស។ ត្រូវបើកការបោះពុម្ពក្នុង ការកំណត់ → ការបោះពុម្ព ជ្រើសរើសម៉ាស៊ីន ហើយចំនួនបោះពុម្ពវិក្កយបត្រមិនត្រូវលើសកម្រិតដែលបានកំណត់។
- Share — tap the share icon to export a high-quality PNG invoice image and open the phone's system share sheet for Telegram, email, or another app.ចែករំលែក — ចុចរូបចែករំលែក ដើម្បីនាំចេញវិក្កយបត្រជារូបភាព PNG គុណភាពខ្ពស់ ហើយបើកផ្ទាំងចែករំលែករបស់ទូរស័ព្ទ សម្រាប់ Telegram អ៊ីមែល ឬកម្មវិធីផ្សេងទៀត។

5.Connection (Block / Unblock)ផ្តាច់ / ភ្ជាប់
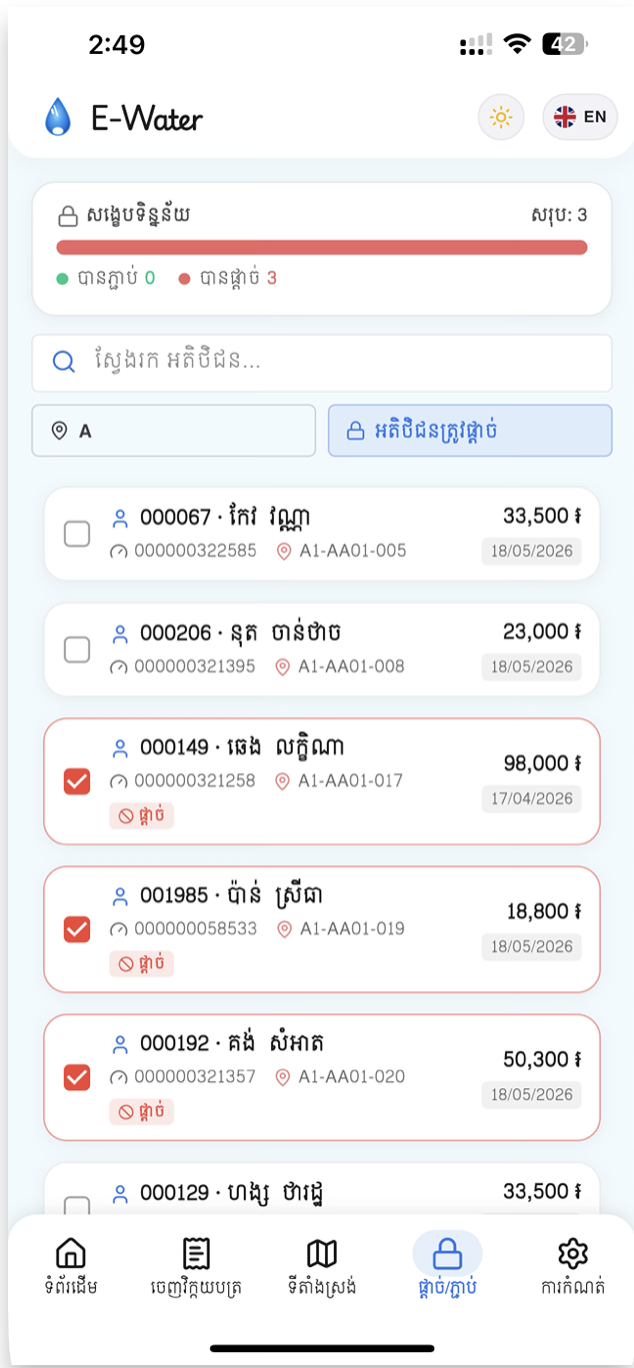
Use the Connection tab to record customer water-supply relay changes in the field. Block is used for customers whose supply must be disconnected; Unblock is used when supply should be restored. Changes are saved locally as you work, then uploaded from the Block/Unblock report.ប្រើផ្ទាំង ផ្តាច់ / ភ្ជាប់ ដើម្បីកត់ត្រាការប្ដូរស្ថានភាពផ្គត់ផ្គង់ទឹករបស់អតិថិជននៅទីតាំងការងារ។ ផ្តាច់ ប្រើសម្រាប់អតិថិជនដែលត្រូវបិទការផ្គត់ផ្គង់ទឹក។ ភ្ជាប់ ប្រើនៅពេលត្រូវបើកទឹកឡើងវិញ។ ការផ្លាស់ប្ដូរត្រូវបានរក្សាទុកក្នុងទូរស័ព្ទភ្លាមៗ ហើយបញ្ជូនតាមរបាយការណ៍ផ្តាច់ / ភ្ជាប់។
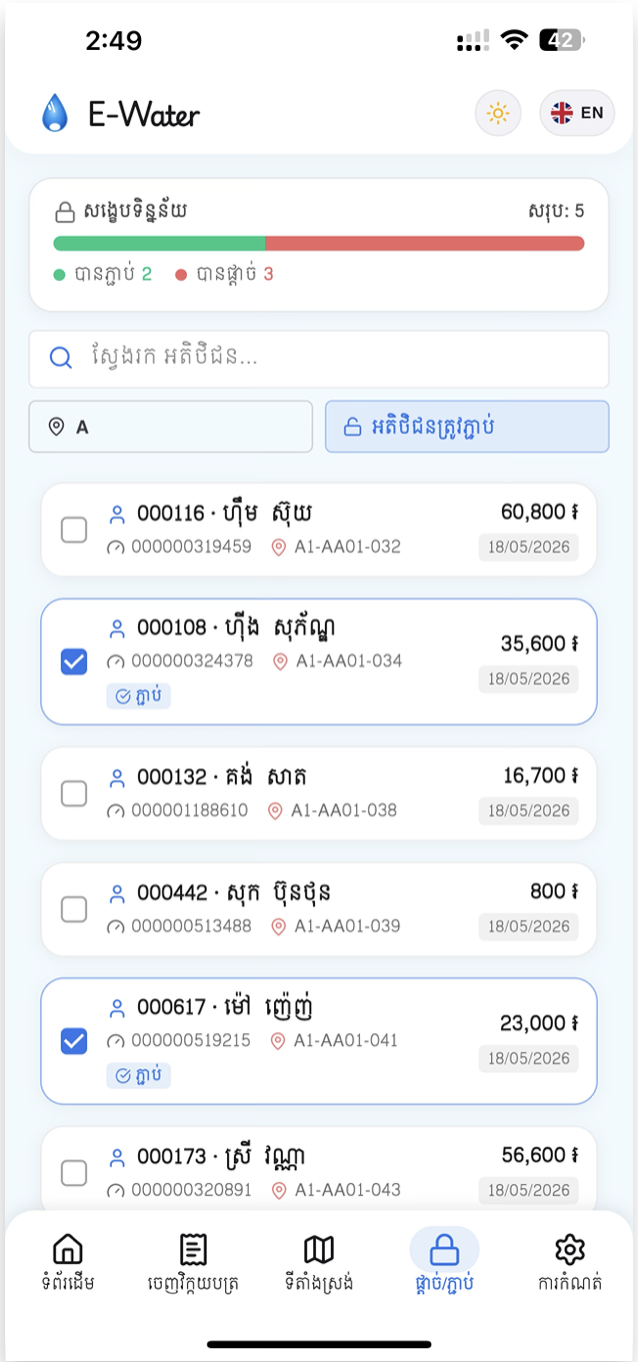
- Read the Summary card. The card at the top shows the current ratio of Unblocked customers in green and Blocked customers in red, with the list total on the right.ពិនិត្យកាតសង្ខេប។ កាតខាងលើបង្ហាញសមាមាត្រអតិថិជន បានភ្ជាប់ ពណ៌បៃតង និង បានផ្តាច់ ពណ៌ក្រហម ដោយមានចំនួនសរុបនៅខាងស្ដាំ។
- Select an area. Tap the area chip, such as A, and choose the required service area. The list updates immediately. This keeps the field list focused on the zone you are visiting.ជ្រើសរើសតំបន់។ ចុច chip តំបន់ ដូចជា A ហើយជ្រើសរើសតំបន់សេវាកម្មដែលត្រូវការ។ បញ្ជីនឹងធ្វើបច្ចុប្បន្នភាពភ្លាមៗ ដើម្បីឱ្យបញ្ជីការងារត្រូវនឹងតំបន់ដែលអ្នកកំពុងចុះធ្វើការ។
- Search when needed. Use Search Customer... to look up a customer by customer code, customer name, meter code, or area. Suggestions appear while you type; tap a suggestion to narrow the list quickly.ស្វែងរកពេលចាំបាច់។ ប្រើ ស្វែងរកអតិថិជន... ដើម្បីស្វែងរកតាមលេខកូដអតិថិជន ឈ្មោះ លេខស្ទង់ ឬតំបន់។ សំណើនឹងបង្ហាញពេលអ្នកវាយ ហើយអាចចុចសំណើមួយ ដើម្បីត្រងបញ្ជីបានលឿន។
- Choose Block or Unblock mode. Tap the right-hand chip labelled Customer block or Customer unblock to switch modes. In Block mode, changed cards use a red Block badge. In Unblock mode, changed cards use a blue Unblock badge.ជ្រើសរើសរបៀប ផ្តាច់ ឬ ភ្ជាប់។ ចុច chip ខាងស្ដាំដែលមានស្លាក ផ្តាច់អតិថិជន ឬ ភ្ជាប់អតិថិជន ដើម្បីប្ដូររបៀប។ ក្នុងរបៀបផ្តាច់ កាតដែលបានប្ដូរបង្ហាញស្លាក ផ្តាច់ ពណ៌ក្រហម។ ក្នុងរបៀបភ្ជាប់ កាតបង្ហាញស្លាក ភ្ជាប់ ពណ៌ខៀវ។
- Update each customer card. Each card shows the customer code and name, meter code, area and box, outstanding amount, and latest invoice date. Tap the checkbox or the card to record the requested relay status. The change is saved locally immediately; there is no separate Save button on this screen.ធ្វើបច្ចុប្បន្នភាពកាតអតិថិជននីមួយៗ។ កាតនីមួយៗបង្ហាញលេខកូដ និងឈ្មោះអតិថិជន លេខស្ទង់ តំបន់ និងប្រអប់ ចំនួនទឹកប្រាក់ជំពាក់ និងថ្ងៃវិក្កយបត្រចុងក្រោយ។ ចុចប្រអប់ធីក ឬកាត ដើម្បីកត់ត្រាស្ថានភាព relay ដែលត្រូវការ។ ការផ្លាស់ប្ដូរត្រូវបានរក្សាទុកក្នុងទូរស័ព្ទភ្លាមៗ ដោយមិនមានប៊ូតុង Save ផ្សេងទៀតលើទំព័រនេះទេ។
- Upload the recorded operations. From Home, open Reports Block And Unblock, review the Blocked and Unblocked groups, then tap UPLOAD. After upload, office staff can review the submitted records in the Desktop system.បញ្ជូនសកម្មភាពដែលបានកត់ត្រា។ ពី ទំព័រដើម សូមបើក របាយការណ៍ផ្តាច់ និងភ្ជាប់ ពិនិត្យក្រុម បានផ្តាច់ និង បានភ្ជាប់ រួចចុច UPLOAD។ បន្ទាប់ពីបញ្ជូន បុគ្គលិកការិយាល័យអាចពិនិត្យកំណត់ត្រាទាំងនេះក្នុងប្រព័ន្ធ Desktop។
6.Maps — Customer Locationsទីតាំង — ទីតាំងអតិថិជន
The Maps tab displays customer GPS locations as pins. Use it to find customers in the field, review collected locations, and open a customer directly for billing or navigation. Nearby pins may be grouped into a cluster until you zoom in.ផ្ទាំងទីតាំងបង្ហាញទីតាំង GPS របស់អតិថិជនជាស្នាមនៅលើផែនទី។ ប្រើផ្ទាំងនេះដើម្បីស្វែងរកអតិថិជននៅទីតាំងជាក់ស្ដែង ពិនិត្យទីតាំងដែលបានកត់ត្រា និងបើកអតិថិជនដោយផ្ទាល់សម្រាប់ចេញវិក្កយបត្រ ឬនាំផ្លូវ។ ស្នាមដែលនៅជិតគ្នាអាចត្រូវបានដាក់ជាក្រុម រហូតដល់អ្នកពង្រីកផែនទី។
- Search for a location. Enter a customer name, customer code, meter code, area, address, or coordinates. Select a suggestion to move the map to the matching customer.ស្វែងរកទីតាំង។ បញ្ចូលឈ្មោះអតិថិជន លេខកូដអតិថិជន លេខស្ទង់ តំបន់ អាសយដ្ឋាន ឬកូអរដោនេ។ ជ្រើសរើសលទ្ធផលណែនាំ ដើម្បីផ្លាស់ទីផែនទីទៅអតិថិជនដែលត្រូវគ្នា។
- Filter the pins. Tap the filter icon and choose either Usage Collecting Customers or All Customers. This keeps the map focused on the group you need.ត្រងស្នាមទីតាំង។ ចុចរូបត្រង ហើយជ្រើស អតិថិជនដែលកំពុងស្រង់អំណាន ឬ អតិថិជនទាំងអស់។ វាជួយឱ្យផែនទីបង្ហាញតែក្រុមដែលអ្នកត្រូវការ។
- Expand grouped pins. When several customers are close together, tap the cluster marker or zoom in to reveal the individual pins.បើកស្នាមដែលបានដាក់ជាក្រុម។ ពេលអតិថិជនជាច្រើននៅជិតគ្នា ចុចស្នាមក្រុម ឬពង្រីកផែនទី ដើម្បីបង្ហាញស្នាមនីមួយៗ។
- Find your current position. Tap the GPS button to centre the map on the phone's current location.រកទីតាំងបច្ចុប្បន្នរបស់អ្នក។ ចុចប៊ូតុង GPS ដើម្បីផ្លាស់ទីផែនទីមកទីតាំងបច្ចុប្បន្នរបស់ទូរស័ព្ទ។
- Change the map style. Tap the style button to cycle through Street, Satellite, Hybrid, and Terrain views.ប្ដូររបៀបផែនទី។ ចុចប៊ូតុងរបៀបផែនទី ដើម្បីប្ដូរតាមលំដាប់រវាង Street, Satellite, Hybrid និង Terrain។
- Zoom the map. Use the + and − buttons or pinch the screen to zoom in and out.ពង្រីក ឬបង្រួមផែនទី។ ប្រើប៊ូតុង + និង − ឬប្រើម្រាមដៃពីរ ដើម្បីពង្រីក និងបង្រួមផែនទី។
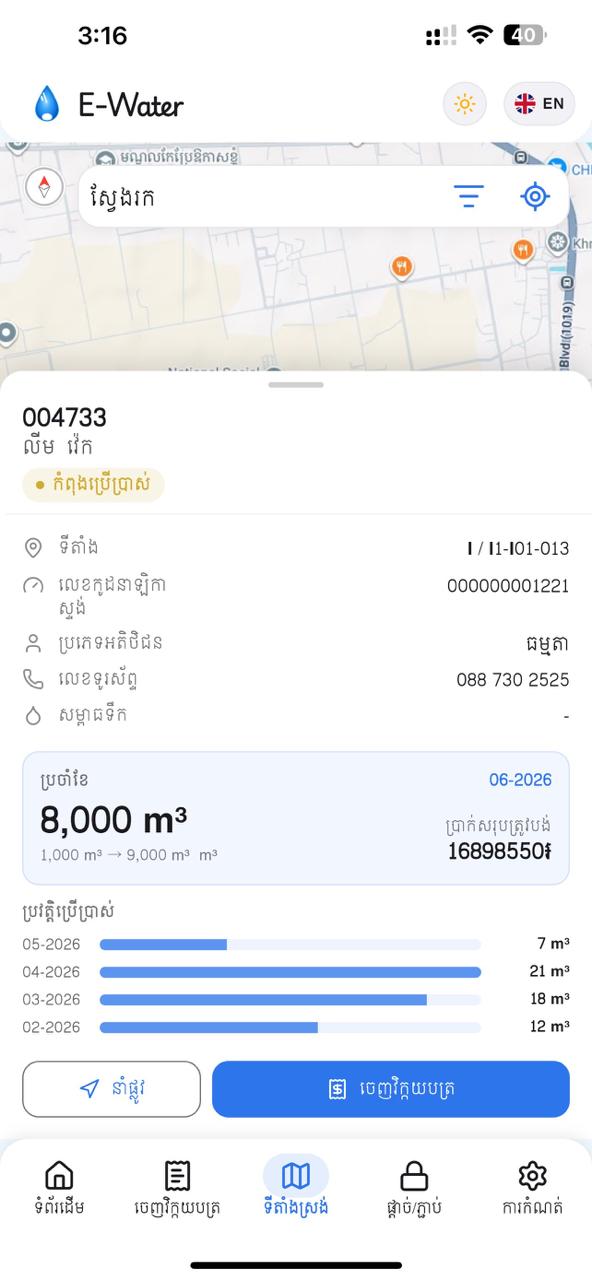
- Open a customer pin. Tap a pin to view customer details, location information, meter information, water pressure, invoice details, and available usage history. Use Navigate to open map directions, or Bill Collection to open that customer's billing form.បើកស្នាមអតិថិជន។ ចុចស្នាមទីតាំង ដើម្បីមើលព័ត៌មានអតិថិជន ទីតាំង ព័ត៌មានស្ទង់ សម្ពាធទឹក ព័ត៌មានវិក្កយបត្រ និងប្រវត្តិប្រើប្រាស់ដែលមាន។ ចុច នាំផ្លូវ ដើម្បីបើកការណែនាំផ្លូវក្នុងផែនទី ឬចុច ចេញវិក្កយបត្រ ដើម្បីបើកទម្រង់ចេញវិក្កយបត្ររបស់អតិថិជននោះ។
7.Reportsរបាយការណ៍
Open the three report pages from the shortcut cards on Home. These pages help you measure field progress, review records that are waiting to be sent, and upload completed work when a connection is available. Use the chart, summary cards, and tabs together to move from a quick overview to the exact customer list you need.បើកទំព័ររបាយការណ៍ទាំងបីពីកាតផ្លូវកាត់នៅទំព័រដើម។ ទំព័រទាំងនេះជួយវាស់វឌ្ឍនភាពការងារនៅទីតាំងអតិថិជន ពិនិត្យទិន្នន័យដែលកំពុងរង់ចាំបញ្ជូន និងបញ្ជូនការងារដែលបានបញ្ចប់ពេលមានអ៊ីនធឺណិត។ ប្រើក្រាហ្វ កាតសង្ខេប និងផ្ទាំងបញ្ជីជាមួយគ្នា ដើម្បីចាប់ផ្ដើមពីទិដ្ឋភាពទូទៅ ហើយបើកបញ្ជីអតិថិជនដែលត្រូវការ។
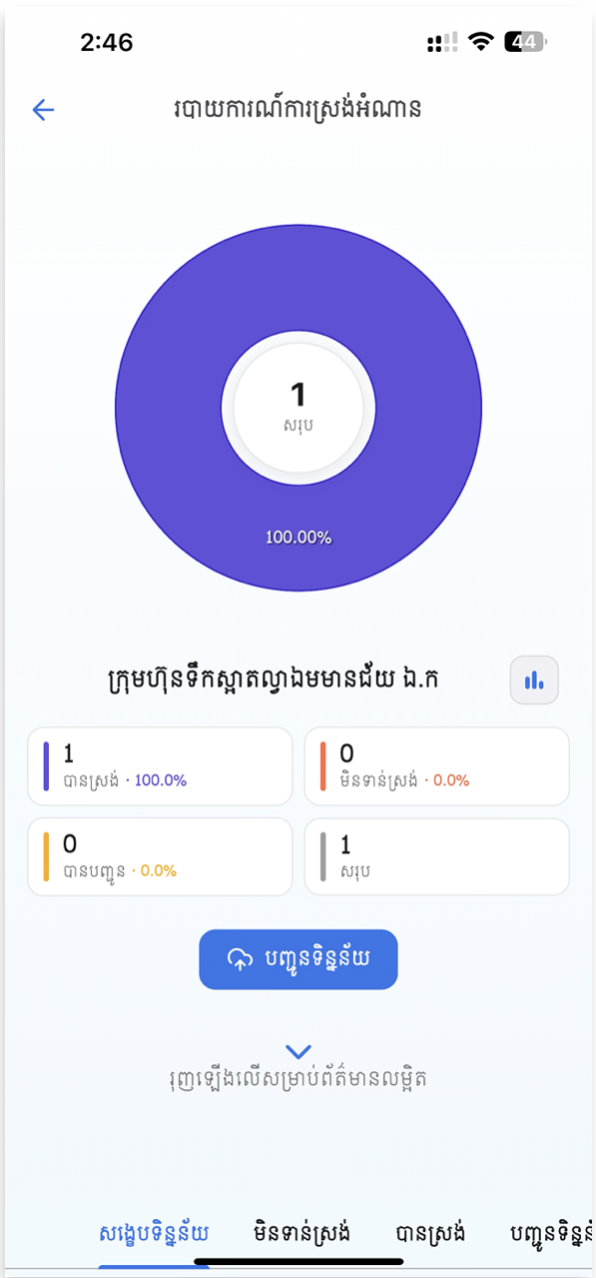
- Report Collect Usage. This page summarizes the current reading round. The chart and summary cards separate customers into Collected, Non Collected, and Submitted groups. Switch between pie and bar views when you want a different comparison. Use the Summary, Non Collected, Collected, and Upload tabs to inspect each list, then tap UPLOAD to send completed usage records to the E-Water system.របាយការណ៍ស្រង់អំណាន។ ទំព័រនេះសង្ខេបវគ្គស្រង់អំណានបច្ចុប្បន្ន។ ក្រាហ្វ និងកាតសង្ខេបបែងចែកអតិថិជនជា បានស្រង់, មិនទាន់ស្រង់ និង បានបញ្ជូន។ អ្នកអាចប្ដូររវាងក្រាហ្វរង្វង់ និងក្រាហ្វបង្គោល ដើម្បីប្រៀបធៀបបានងាយ។ ប្រើផ្ទាំង សង្ខេប, មិនទាន់ស្រង់, បានស្រង់ និង Upload ដើម្បីពិនិត្យបញ្ជីនីមួយៗ រួចចុច UPLOAD ដើម្បីបញ្ជូនទិន្នន័យប្រើប្រាស់ដែលបានបញ្ចប់ទៅប្រព័ន្ធ E-Water។
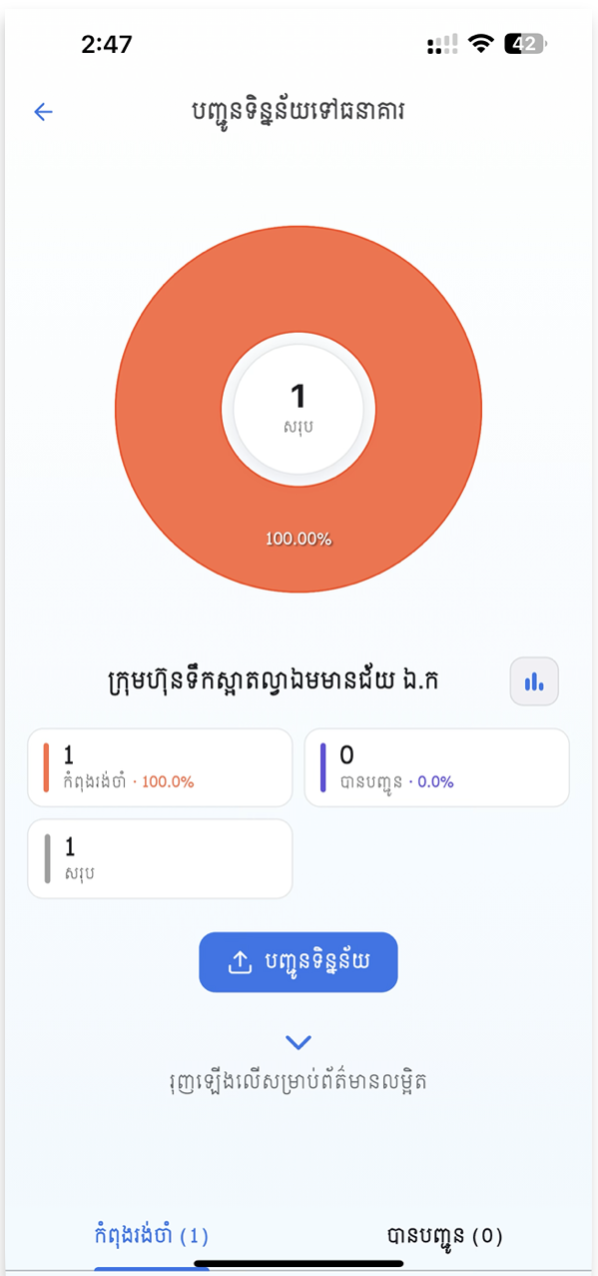
- Sent Usage To Bank. This page tracks collected invoices that must be sent onward. Pending means an invoice is waiting to be sent; Submitted means it has already been sent. Use the two tabs to inspect both groups. When the Pending list is ready and the phone is online, tap UPLOAD to submit the waiting invoices.បញ្ជូនទិន្នន័យទៅធនាគារ។ ទំព័រនេះតាមដានវិក្កយបត្រដែលបានស្រង់ ហើយត្រូវបញ្ជូនបន្ត។ Pending មានន័យថាវិក្កយបត្រកំពុងរង់ចាំបញ្ជូន។ Submitted មានន័យថាវិក្កយបត្រត្រូវបានបញ្ជូនរួច។ ប្រើផ្ទាំងទាំងពីរដើម្បីពិនិត្យក្រុមនីមួយៗ។ ពេលបញ្ជី Pending រួចរាល់ ហើយទូរស័ព្ទមានអ៊ីនធឺណិត ចុច UPLOAD ដើម្បីបញ្ជូនវិក្កយបត្រដែលកំពុងរង់ចាំ។
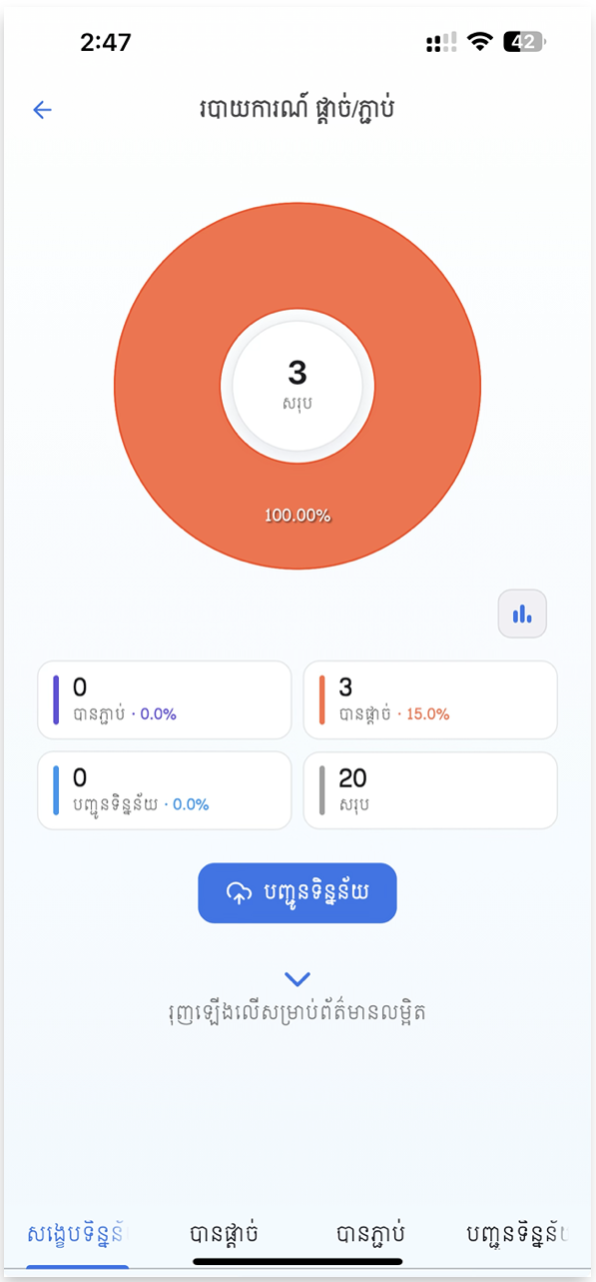
- Reports Block And Unblock. This page summarizes relay operations recorded in the Connection tab. The chart and cards separate Unblocked, Blocked, and Upload records. Use the Summary, Blocked, Unblocked, and Upload tabs to review the requested status changes, then tap UPLOAD to send pending operations to the E-Water system.របាយការណ៍ផ្តាច់ និងភ្ជាប់។ ទំព័រនេះសង្ខេបសកម្មភាព relay ដែលបានកត់ត្រាក្នុងផ្ទាំង ផ្តាច់ / ភ្ជាប់។ ក្រាហ្វ និងកាតសង្ខេបបែងចែកទិន្នន័យជា បានភ្ជាប់, បានផ្តាច់ និង Upload។ ប្រើផ្ទាំង សង្ខេប, បានផ្តាច់, បានភ្ជាប់ និង Upload ដើម្បីពិនិត្យការផ្លាស់ប្ដូរស្ថានភាពដែលបានស្នើ រួចចុច UPLOAD ដើម្បីបញ្ជូនសកម្មភាពដែលកំពុងរង់ចាំទៅប្រព័ន្ធ E-Water។
- Open a matching list quickly. On supported report cards, tap a chart slice or summary card to jump to the corresponding tab instead of searching through the lists manually.បើកបញ្ជីដែលត្រូវការបានលឿន។ នៅលើកាតរបាយការណ៍ដែលគាំទ្រ អ្នកអាចចុចផ្នែកក្រាហ្វ ឬកាតសង្ខេប ដើម្បីលោតទៅផ្ទាំងដែលត្រូវគ្នា ដោយមិនចាំបាច់ស្វែងរកក្នុងបញ្ជីដោយដៃ។
8.Settingsការកំណត់
Settings brings the app's operational controls together in one place. Use it before field work to confirm your downloaded database, automation preferences, Bluetooth printer, language, and appearance. Most changes take effect immediately without restarting the app.ទំព័រ ការកំណត់ ប្រមូលផ្ដុំការគ្រប់គ្រងសំខាន់ៗរបស់កម្មវិធីនៅកន្លែងតែមួយ។ ប្រើវាមុនចុះធ្វើការ ដើម្បីពិនិត្យមូលដ្ឋានទិន្នន័យដែលបានទាញយក ការកំណត់ស្វ័យប្រវត្តិ ម៉ាស៊ីនបោះពុម្ព Bluetooth ភាសា និងរូបរាង។ ការផ្លាស់ប្ដូរភាគច្រើនមានប្រសិទ្ធភាពភ្លាមៗ ដោយមិនចាំបាច់ចាប់ផ្ដើមកម្មវិធីឡើងវិញ។
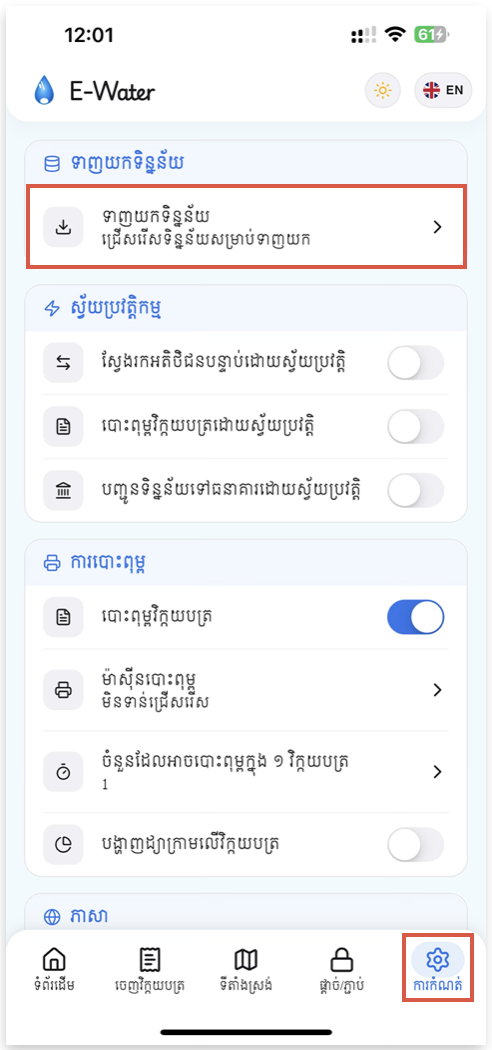
- Download Data. Open this page to activate the device, select a database version, and download the customer data required for the current reading round. See section 1 for the full setup flow.ទាញយកទិន្នន័យ។ បើកទំព័រនេះ ដើម្បីធ្វើឱ្យឧបករណ៍សកម្ម ជ្រើសរើសកំណែមូលដ្ឋានទិន្នន័យ និងទាញយកទិន្នន័យអតិថិជនសម្រាប់វគ្គស្រង់បច្ចុប្បន្ន។ សូមមើលផ្នែកទី 1 សម្រាប់ជំហានលម្អិត។
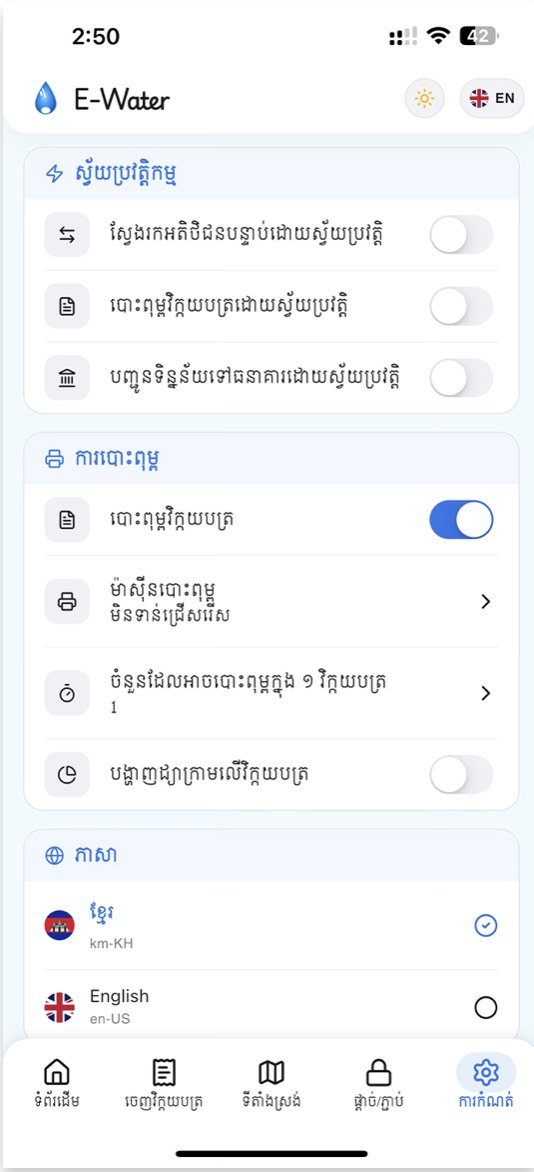
- Automation. Auto move customer advances to the next customer after saving. Auto Print Invoice prints automatically after a valid reading is completed. Auto send data to bank attempts to send saved invoices without waiting for a manual upload.ស្វ័យប្រវត្តិ។ ផ្លាស់ទីអតិថិជនស្វ័យប្រវត្តិ បើកអតិថិជនបន្ទាប់ក្រោយរក្សាទុក។ បោះពុម្ពវិក្កយបត្រស្វ័យប្រវត្តិ បោះពុម្ពភ្លាមៗ ក្រោយបញ្ចប់អំណានត្រឹមត្រូវ។ ផ្ញើទិន្នន័យទៅធនាគារស្វ័យប្រវត្តិ ព្យាយាមបញ្ជូនវិក្កយបត្រដែលបានរក្សាទុក ដោយមិនរង់ចាំការបញ្ជូនដោយដៃ។
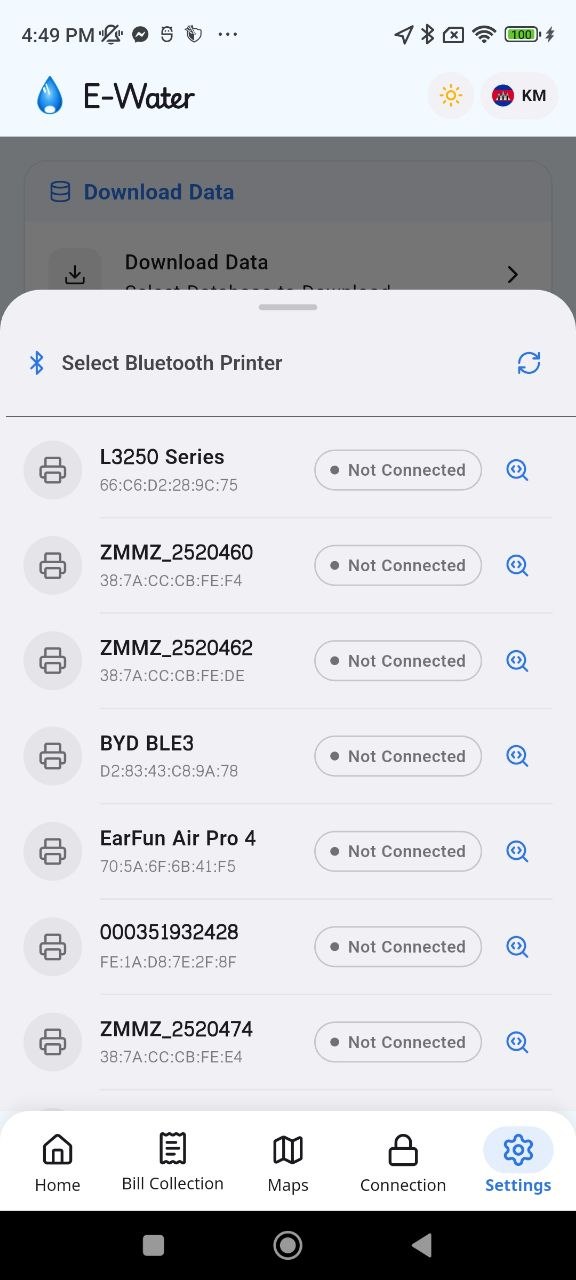
- Printing. Use Print Invoice to enable or disable receipt printing. Tap Printer to scan for a Bluetooth thermal printer; pair it in the phone's Bluetooth settings first when required. Set Max Print times per invoice from 0 to 10 to control reprints: the default is 1, and 0 disables printing. Enable Show chart on invoice to add a usage chart to the receipt.ការបោះពុម្ព។ ប្រើ បោះពុម្ពវិក្កយបត្រ ដើម្បីបើក ឬបិទការបោះពុម្ពបង្កាន់ដៃ។ ចុច ម៉ាស៊ីនបោះពុម្ព ដើម្បីស្វែងរកម៉ាស៊ីនបោះពុម្ព Thermal តាម Bluetooth ហើយភ្ជាប់វាក្នុងការកំណត់ Bluetooth របស់ទូរស័ព្ទជាមុន ប្រសិនបើចាំបាច់។ កំណត់ ចំនួនបោះពុម្ពក្នុង ១ វិក្កយបត្រ ពី 0 ដល់ 10 ដើម្បីគ្រប់គ្រងការបោះពុម្ពឡើងវិញ៖ លំនាំដើមគឺ 1 ហើយ 0 មានន័យថាបិទការបោះពុម្ព។ បើក បង្ហាញក្រាហ្វលើវិក្កយបត្រ ដើម្បីបន្ថែមក្រាហ្វប្រើប្រាស់លើបង្កាន់ដៃ។
- Languages. Select Khmer (km-KH) or English (en-US). Labels across the app update immediately.ភាសា។ ជ្រើសរើស ភាសាខ្មែរ (km-KH) ឬ English (en-US)។ ស្លាកក្នុងកម្មវិធីធ្វើបច្ចុប្បន្នភាពភ្លាមៗ។
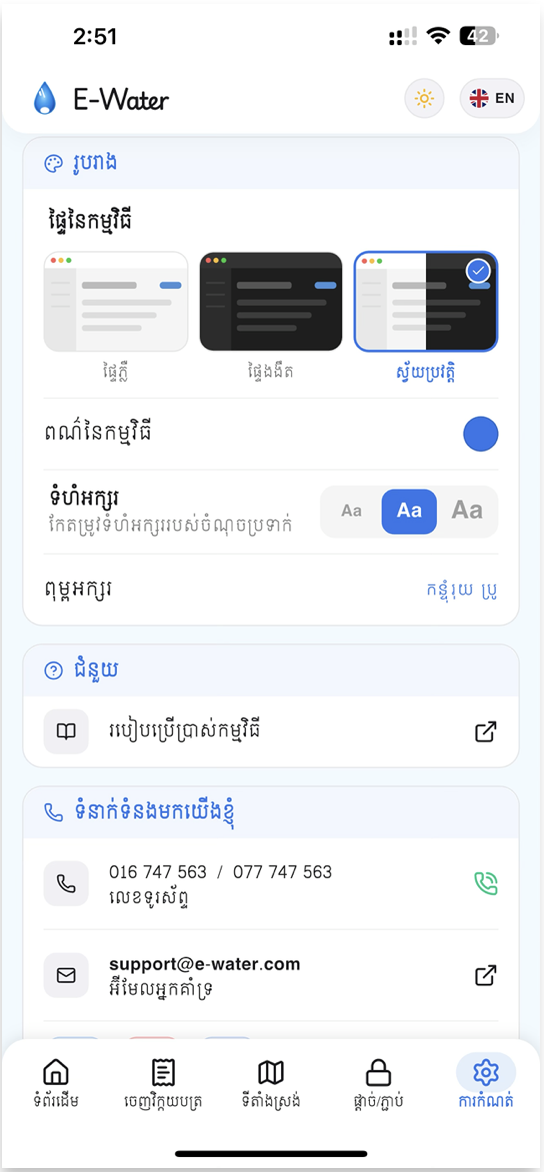
- Appearance. Choose a Light, Dark, or Auto theme. You can also change the theme colour, text size, and font used across the app.រូបរាង។ ជ្រើសរើសផ្ទាំង ភ្លឺ, ងងឹត ឬ ស្វ័យប្រវត្តិ។ អ្នកក៏អាចប្ដូរពណ៌ផ្ទាំង ទំហំអក្សរ និងពុម្ពអក្សរដែលប្រើក្នុងកម្មវិធី។
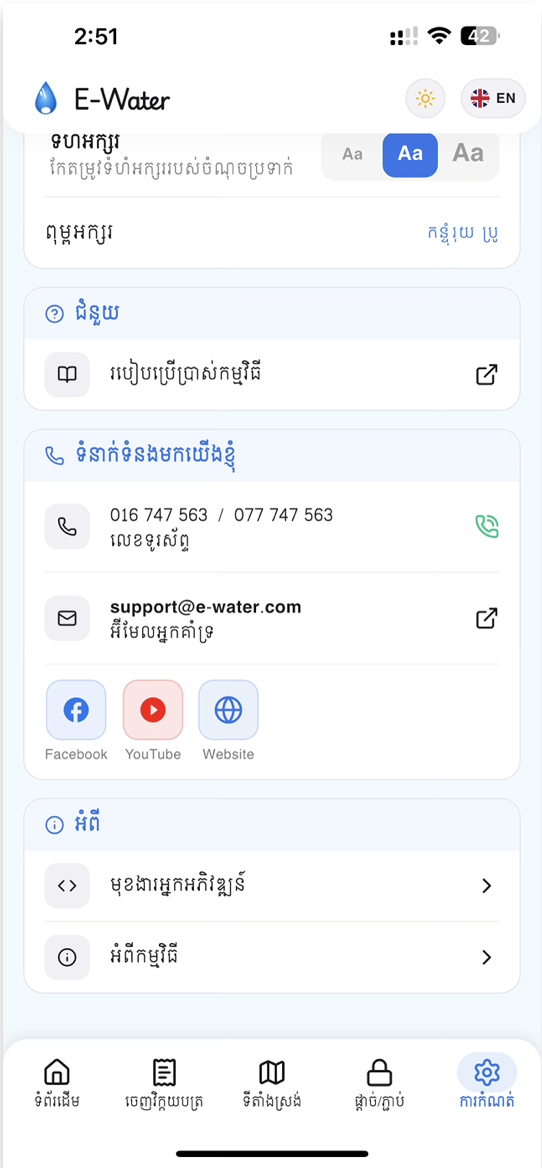
- Help. Tap User Guide to open this bilingual documentation site.ជំនួយ។ ចុច មគ្គុទេសក៍ប្រើប្រាស់ ដើម្បីបើកគេហទំព័រណែនាំពីរភាសានេះ។
- Contact Us. Use the available phone numbers, support email, Facebook, YouTube, and website links when assistance is needed.ទំនាក់ទំនងយើងខ្ញុំ។ ប្រើលេខទូរស័ព្ទ អ៊ីមែលជំនួយ Facebook, YouTube និងតំណគេហទំព័រ ពេលត្រូវការជំនួយ។
- About. Open About App to see the installed version, build number, platform, and cache size. The Developer Options row is only shown after developer mode has been unlocked.អំពី។ បើក អំពីកម្មវិធី ដើម្បីមើលកំណែ លេខ build វេទិកា និងទំហំ cache ដែលបានដំឡើង។ ជួរ ជម្រើសសម្រាប់អ្នកអភិវឌ្ឍន៍ បង្ហាញតែក្រោយពេលបានបើក developer mode ប៉ុណ្ណោះ។
9.About Appអំពីកម្មវិធី
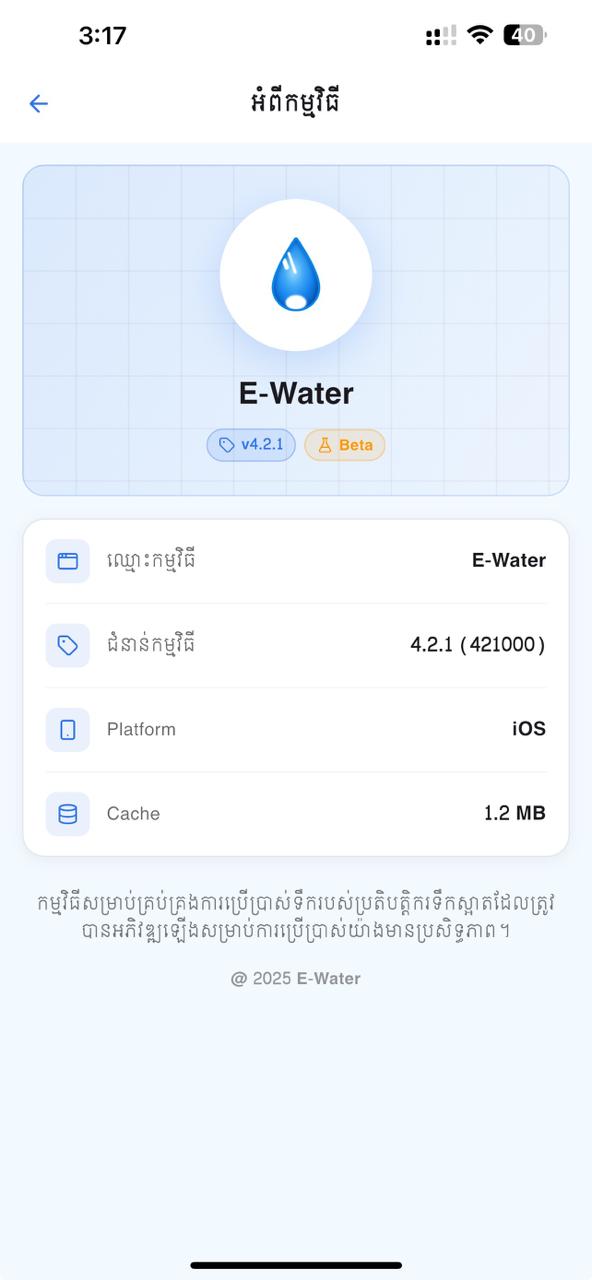
Open Settings → About App to identify the exact app installation on the phone. This is useful when reporting an issue because support staff can confirm the release, build number, platform, and local cache information from one screen. The page also contains the hidden unlock gesture for Developer Options.បើក ការកំណត់ → អំពីកម្មវិធី ដើម្បីស្គាល់កំណែកម្មវិធីដែលបានដំឡើងក្នុងទូរស័ព្ទឱ្យបានច្បាស់។ វាមានប្រយោជន៍ពេលរាយការណ៍បញ្ហា ព្រោះក្រុមជំនួយអាចពិនិត្យកំណែ លេខ build វេទិកា និងព័ត៌មាន cache ក្នុងទូរស័ព្ទពីទំព័រតែមួយ។ ទំព័រនេះក៏មានសកម្មភាពសម្ងាត់សម្រាប់បើក ជម្រើសសម្រាប់អ្នកអភិវឌ្ឍន៍ ផងដែរ។
- App Name. Confirms that the installed application is E-Water.ឈ្មោះកម្មវិធី។ បញ្ជាក់ថាកម្មវិធីដែលបានដំឡើងគឺ E-Water។
- App Version. Shows the release version and the exact build number in parentheses, for example 4.2.2 (422000). Include both values when contacting support.កំណែកម្មវិធី។ បង្ហាញកំណែ release និងលេខ build ជាក់លាក់ក្នុងរង្វង់ក្រចក ឧទាហរណ៍ 4.2.2 (422000)។ សូមផ្ដល់តម្លៃទាំងពីរ ពេលទាក់ទងក្រុមជំនួយ។
- Platform. Shows the operating system used by this installation, such as Android or iOS.វេទិកា។ បង្ហាញប្រព័ន្ធប្រតិបត្តិការដែលកម្មវិធីនេះកំពុងប្រើ ដូចជា Android ឬ iOS។
- Cache. Shows the amount of local cached data currently used by the app. This helps support staff investigate storage-related issues.Cache។ បង្ហាញទំហំទិន្នន័យ cache ដែលកម្មវិធីកំពុងប្រើក្នុងទូរស័ព្ទ។ ព័ត៌មាននេះជួយក្រុមជំនួយពិនិត្យបញ្ហាដែលពាក់ព័ន្ធនឹងទំហំផ្ទុក។
- Hidden Developer Options unlock. Technical staff can tap the App Version row seven times in quick succession. The app then opens the protected Developer Options flow and asks for a PIN.ការបើក ជម្រើសសម្រាប់អ្នកអភិវឌ្ឍន៍ ដោយសម្ងាត់។ បុគ្គលិកបច្ចេកទេសអាចចុចជួរ កំណែកម្មវិធី ចំនួន 7 ដងជាប់ៗគ្នា។ បន្ទាប់មកកម្មវិធីបើកដំណើរការ ជម្រើសសម្រាប់អ្នកអភិវឌ្ឍន៍ ដែលត្រូវបានការពារ ហើយស្នើឱ្យបញ្ចូល PIN។
10.Developer Optionsជម្រើសសម្រាប់អ្នកអភិវឌ្ឍន៍
Developer Options are hidden by default and intended for technical staff only. To unlock them, open Settings → About App, tap the App Version row 7 times in quick succession, and enter the developer PIN. After the unlock is completed, Developer Options also appears in the Settings page.ជម្រើសសម្រាប់អ្នកអភិវឌ្ឍន៍ ត្រូវបានលាក់តាមលំនាំដើម ហើយសម្រាប់បុគ្គលិកបច្ចេកទេសប៉ុណ្ណោះ។ ដើម្បីបើក សូមចូល ការកំណត់ → អំពីកម្មវិធី ចុចជួរ កំណែកម្មវិធី 7 ដង ជាប់ៗគ្នា ហើយបញ្ចូល PIN សម្រាប់អ្នកអភិវឌ្ឍន៍។ ក្រោយបើករួច ជួរ ជម្រើសសម្រាប់អ្នកអភិវឌ្ឍន៍ ក៏បង្ហាញក្នុងទំព័រ ការកំណត់ ផងដែរ។
- Confirm developer mode. The page shows whether Developer Mode is enabled. Keep it disabled on normal field devices unless technical support has asked you to use it.ពិនិត្យ Developer Mode។ ទំព័រនេះបង្ហាញថា Developer Mode បានបើក ឬអត់។ សូមទុកវាបិទលើទូរស័ព្ទការងារធម្មតា លើកលែងតែក្រុមជំនួយបច្ចេកទេសស្នើឱ្យប្រើ។
- Review the environment list. Each environment entry shows its name and server URL. The selected environment is marked with a check. Common entries include Dev_UAT, Production, and Pilot.ពិនិត្យបញ្ជីបរិស្ថាន។ បរិស្ថាននីមួយៗបង្ហាញឈ្មោះ និង URL ម៉ាស៊ីនមេ។ បរិស្ថានដែលកំពុងប្រើមានសញ្ញាធីក។ ជាទូទៅមាន Dev_UAT, Production និង Pilot។
- Switch environments only when instructed. Tap another environment and read the confirmation warning carefully. After confirmation, the app uses the selected server URL. Changing environments can require users on the device to sign in again with OTP.ប្ដូរបរិស្ថានតែពេលមានការណែនាំ។ ចុចបរិស្ថានផ្សេង ហើយអានសារបញ្ជាក់ដោយប្រុងប្រយ័ត្ន។ ក្រោយបញ្ជាក់ កម្មវិធីប្រើ URL ម៉ាស៊ីនមេដែលបានជ្រើស។ ការប្ដូរបរិស្ថានអាចតម្រូវឱ្យអ្នកប្រើក្នុងឧបករណ៍ចូលប្រើម្ដងទៀតដោយ OTP។
- Disable developer mode after support work. Turn off the Developer Mode switch and confirm the prompt. The advanced row is hidden again and the app returns to the normal Settings flow.បិទ developer mode ក្រោយបញ្ចប់ការងារជំនួយ។ បិទកុងតាក់ Developer Mode ហើយបញ្ជាក់សារ។ ជួរការកំណត់កម្រិតខ្ពស់ត្រូវបានលាក់ឡើងវិញ ហើយកម្មវិធីត្រឡប់ទៅការកំណត់ធម្មតា។
Warning: Changing the environment on a production device points the app to a different server. Only do this under instruction from the development team.ការប្រមាន៖ ការប្ដូរបរិស្ថានលើទូរស័ព្ទ production ធ្វើឱ្យកម្មវិធីភ្ជាប់ទៅម៉ាស៊ីនមេផ្សេង។ សូមធ្វើតែពេលមានការណែនាំពីក្រុមអភិវឌ្ឍន៍ប៉ុណ្ណោះ។
Need help? Contact the development team via Telegram:ត្រូវការជំនួយ? ទាក់ទងក្រុម development តាម Telegram:
